Epson PowerLite Pro Cinema 6010 User's Guide - Page 66
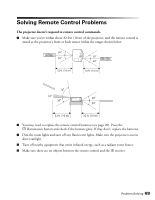
Only part of the picture is displayed, or the picture is distorted.
 |
View all Epson PowerLite Pro Cinema 6010 manuals
Add to My Manuals
Save this manual to your list of manuals |
Page 66 highlights
3D content does not display or does not display correctly. ■ Press the 2D/3D button on the remote control to switch to 3D viewing mode, if necessary. ■ Make sure you are within the 3D viewing range (see page 11). ■ Check that your video device and media are both 3D-compatible. Refer to the documentation that came with your video device for more information. ■ Press the Menu button on the remote control, select the Signal menu, then 3D Setup, then select 3D Format. Make sure that the Auto option is selected. ■ Make sure the Inverse 3D Glasses option is set to No (see page 41). Only part of the picture is displayed, or the picture is distorted. ■ Press the Aspect button on the remote control to select a different aspect ratio (see page 26). ■ If the Aspect is set to Zoom, you may need to use the Zoom Caption Pos. option to see the top or bottom section of the screen so that subtitles are visible (see page 49). ■ Check the Overscan setting to make sure it's adjusted correctly (see page 48). ■ Use the Position setting to reposition the image on the screen (see page 48). ■ If you've connected a computer and you see only half the image, make sure the computer's Dual Display setting is turned off. ■ If part of the image is cut off, reset the projector settings (see page 47). You're using a computer and no picture appears on the screen. If you're using a Windows® laptop: ■ Press the function key that lets you display on an external monitor. It's often labeled with an icon such as , but it may also be labeled CRT/LCD. You may have to hold down the Fn key while pressing it. Check your laptop's manual or online help. On most systems, the key lets you toggle between the LCD screen and the projector, or display on both at the same time. Allow a few seconds for the projector to sync up after pressing it. ■ If the function key doesn't let you display simultaneously on both screens, you might need to use the Display utility in the Windows Control Panel to make sure that both the LCD screen and external monitor port are enabled. From the Windows Control Panel, open the Display utility. In the Display Properties dialog box, click the Settings tab, then click Advanced. The method for adjusting the setting varies from computer to 66 Problem Solving
-
 1
1 -
2
-
3
-
4
-
5
-
6
-
7
-
8
-
9
-
10
-
11
-
12
-
13
-
14
-
15
-
16
-
17
-
18
-
19
-
20
-
21
-
22
-
23
-
24
-
25
-
26
-
27
-
28
-
29
-
30
-
31
-
32
-
33
-
34
-
35
-
36
-
37
-
38
-
39
-
40
-
41
-
42
-
43
-
44
-
45
-
46
-
47
-
48
-
49
-
50
-
51
-
52
-
53
-
54
-
55
-
56
-
57
-
58
-
59
-
60
-
 61
61 -
 62
62 -
 63
63 -
 64
64 -
 65
65 -
 66
66 -
 67
67 -
 68
68 -
 69
69 -
 70
70 -
 71
71 -
72
-
73
-
74
-
75
-
76
-
77
-
78
-
79
 |
 |
