Epson Stylus COLOR 850Ne User Manual - Page 37
Using Predefined Advanced Settings
 |
View all Epson Stylus COLOR 850Ne manuals
Add to My Manuals
Save this manual to your list of manuals |
Page 37 highlights
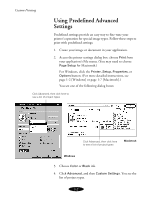
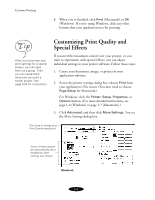
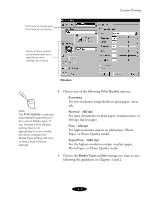
Custom Printing Using Predefined Advanced Settings Predefined settings provide an easy way to fine-tune your printer's operation for special image types. Follow these steps to print with predefined settings: 1. Create your image or document in your application. 2. Access the printer settings dialog box: choose Print from your application's File menu. (You may need to choose Page Setup for Macintosh.) For Windows, click the Printer, Setup, Properties, or Options button. (For more detailed instructions, see page 1-2 [Windows] or page 1-7 [Macintosh].) You see one of the following dialog boxes: Click Advanced, then click here to see a list of project types Click Advanced, then click here to see a list of project types Macintosh Windows 3. Choose Color or Black ink. 4. Click Advanced, and then Custom Settings. You see the list of project types. 3-2
-
 1
1 -
2
-
3
-
4
-
5
-
6
-
7
-
8
-
9
-
10
-
11
-
12
-
13
-
14
-
15
-
16
-
17
-
18
-
19
-
20
-
21
-
22
-
23
-
24
-
25
-
26
-
27
-
28
-
29
-
30
-
31
-
 32
32 -
 33
33 -
 34
34 -
 35
35 -
 36
36 -
 37
37 -
 38
38 -
 39
39 -
 40
40 -
 41
41 -
 42
42 -
43
-
44
-
45
-
46
-
47
-
48
-
49
-
50
-
51
-
52
-
53
-
54
-
55
-
56
-
57
-
58
-
59
-
60
-
61
-
62
-
63
-
64
-
65
-
66
-
67
-
68
-
69
-
70
-
71
-
72
-
73
-
74
-
75
-
76
-
77
-
78
-
79
-
80
-
81
-
82
-
83
-
84
-
85
-
86
-
87
-
88
-
89
-
90
-
91
-
92
-
93
-
94
-
95
-
96
-
97
-
98
-
99
-
100
-
101
-
102
-
103
-
104
-
105
-
106
-
107
-
108
-
109
-
110
-
111
-
112
-
113
-
114
-
115
-
116
-
117
-
118
-
119
-
120
-
121
-
122
-
123
-
124
-
125
-
126
-
127
-
128
-
129
-
130
-
131
-
132
-
133
-
134
-
135
-
136
-
137
-
138
-
139
 |
 |
