Epson Z9870UNL User Manual - Page 102
Resizing the Image with the Zoom Button, Image Shape, Projector Feature Settings - Settings Menu
 |
View all Epson Z9870UNL manuals
Add to My Manuals
Save this manual to your list of manuals |
Page 102 highlights
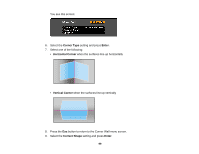
16. Adjust the linearity by doing the following as necessary: • Press and hold the left arrow button to contract the distance between the lines closest to the left or top of the image. • Press and hold the right arrow button to contract the distance between the lines closest to the right or bottom of the image. 17. When you are finished, press Menu. Note: If necessary, you can fine-tune the results of your Corner Wall adjustments using Point Correction. Parent topic: Image Shape Related references Projector Feature Settings - Settings Menu Related tasks Displaying a Test Pattern Correcting Image Shape with Point Correction Resizing the Image with the Zoom Button 1. Turn on the projector and display an image. 102
-
 1
1 -
2
-
3
-
4
-
5
-
6
-
7
-
8
-
9
-
10
-
11
-
12
-
13
-
14
-
15
-
16
-
17
-
18
-
19
-
20
-
21
-
22
-
23
-
24
-
25
-
26
-
27
-
28
-
29
-
30
-
31
-
32
-
33
-
34
-
35
-
36
-
37
-
38
-
39
-
40
-
41
-
42
-
43
-
44
-
45
-
46
-
47
-
48
-
49
-
50
-
51
-
52
-
53
-
54
-
55
-
56
-
57
-
58
-
59
-
60
-
61
-
62
-
63
-
64
-
65
-
66
-
67
-
68
-
69
-
70
-
71
-
72
-
73
-
74
-
75
-
76
-
77
-
78
-
79
-
80
-
81
-
82
-
83
-
84
-
85
-
86
-
87
-
88
-
89
-
90
-
91
-
92
-
93
-
94
-
95
-
96
-
 97
97 -
 98
98 -
 99
99 -
 100
100 -
 101
101 -
 102
102 -
 103
103 -
 104
104 -
 105
105 -
 106
106 -
 107
107 -
108
-
109
-
110
-
111
-
112
-
113
-
114
-
115
-
116
-
117
-
118
-
119
-
120
-
121
-
122
-
123
-
124
-
125
-
126
-
127
-
128
-
129
-
130
-
131
-
132
-
133
-
134
-
135
-
136
-
137
-
138
-
139
-
140
-
141
-
142
-
143
-
144
-
145
-
146
-
147
-
148
-
149
-
150
-
151
-
152
-
153
-
154
-
155
-
156
-
157
-
158
-
159
-
160
-
161
-
162
-
163
-
164
-
165
-
166
-
167
-
168
-
169
-
170
-
171
-
172
-
173
-
174
-
175
-
176
-
177
-
178
-
179
-
180
-
181
-
182
-
183
-
184
-
185
-
186
-
187
-
188
-
189
-
190
-
191
-
192
-
193
-
194
-
195
-
196
-
197
-
198
-
199
-
200
-
201
-
202
-
203
-
204
-
205
-
206
-
207
-
208
-
209
-
210
-
211
-
212
-
213
-
214
-
215
-
216
-
217
-
218
-
219
-
220
-
221
-
222
-
223
-
224
-
225
-
226
-
227
-
228
-
229
-
230
-
231
-
232
-
233
-
234
-
235
-
236
-
237
-
238
-
239
-
240
-
241
-
242
-
243
-
244
-
245
-
246
-
247
-
248
-
249
-
250
-
251
-
252
-
253
-
254
-
255
-
256
-
257
-
258
-
259
-
260
-
261
-
262
-
263
-
264
-
265
-
266
-
267
-
268
-
269
-
270
-
271
-
272
-
273
-
274
-
275
-
276
-
277
-
278
-
279
-
280
-
281
-
282
-
283
-
284
-
285
-
286
-
287
-
288
 |
 |
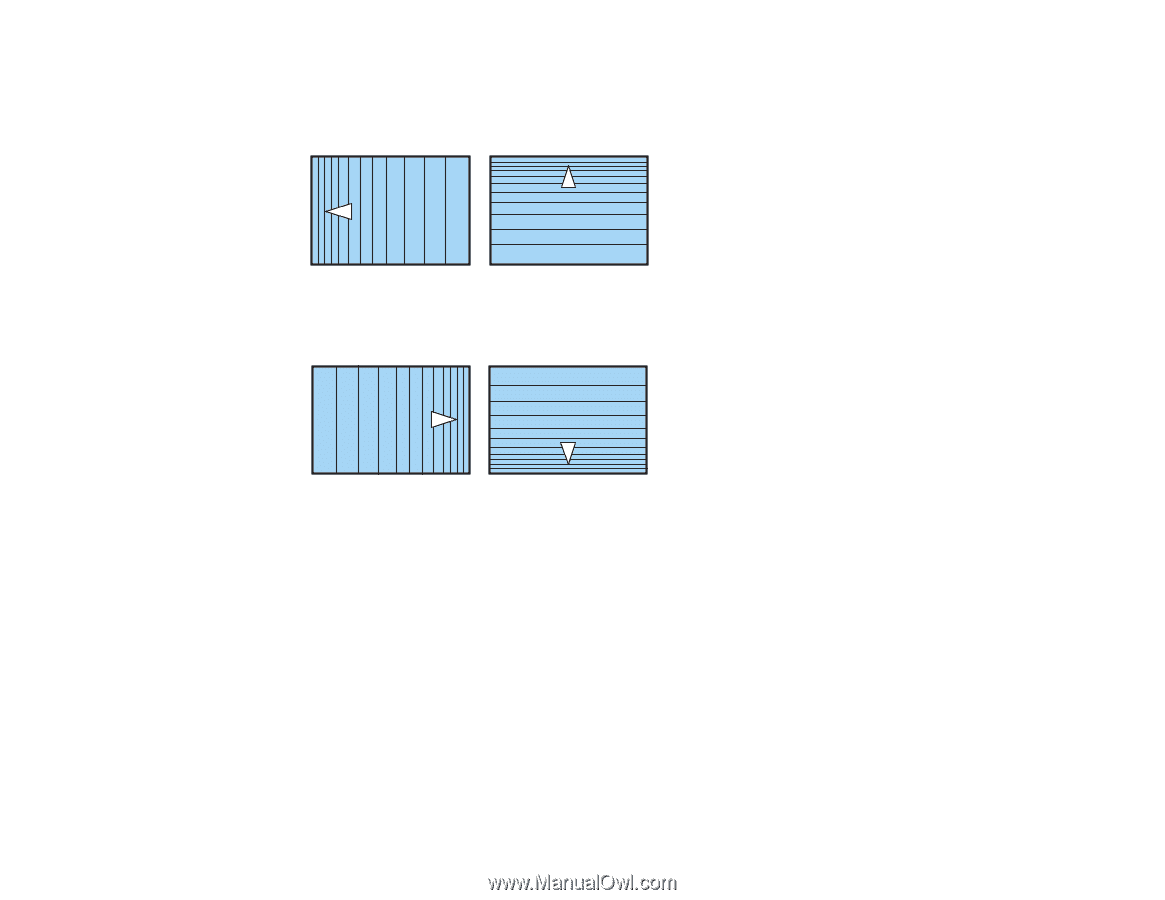
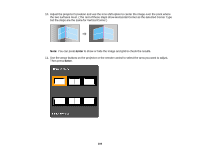
16. Adjust the linearity by doing the following as necessary:
• Press and hold the left arrow button to contract the distance between the lines closest to the left or
top of the image.
• Press and hold the right arrow button to contract the distance between the lines closest to the right
or bottom of the image.
17. When you are finished, press
Menu
.
Note:
If necessary, you can fine-tune the results of your Corner Wall adjustments using Point Correction.
Parent topic:
Image Shape
Related references
Projector Feature Settings - Settings Menu
Related tasks
Displaying a Test Pattern
Correcting Image Shape with Point Correction
Resizing the Image with the Zoom Button
1.
Turn on the projector and display an image.
102