Epson Z9870UNL User Manual - Page 109
Projection Modes, Changing the Projection Mode Using the Menus
 |
View all Epson Z9870UNL manuals
Add to My Manuals
Save this manual to your list of manuals |
Page 109 highlights
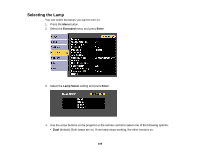
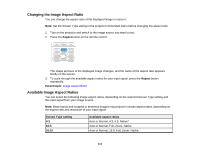
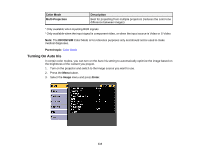
• Single: When the projector is turned on, the lamp with the fewest number of total operation hours turns on. If that lamp stops working, the other lamp turns on. • Lamp 1: Lamp 1 turns on. If Lamp 1 stops working, Lamp 2 turns on. • Lamp 2: Lamp 2 turns on. If Lamp 2 stops working, Lamp 1 turns on. 5. When you are finished, press the Menu button. Parent topic: Using Basic Projector Features Projection Modes Depending on how you positioned the projector, you may need to change the projection mode so your images project correctly. • Front (default setting) lets you project from a table in front of the screen. • Front/Upside Down flips the image over top-to-bottom to project upside-down from a wall or ceiling mount. • Rear flips the image horizontally to project from behind a translucent screen. • Rear/Upside Down flips the image over top-to-bottom and horizontally to project from the wall or ceiling and behind a translucent screen. You can change the projection mode using the remote control or by changing the Projection setting in the Extended menu. Changing the Projection Mode Using the Menus Parent topic: Using Basic Projector Features Changing the Projection Mode Using the Menus You can change the projection mode to flip the image over top-to-bottom and/or left-to-right using the projector menus. 1. Turn on the projector and display an image. 2. Press the Menu button. 109
-
 1
1 -
2
-
3
-
4
-
5
-
6
-
7
-
8
-
9
-
10
-
11
-
12
-
13
-
14
-
15
-
16
-
17
-
18
-
19
-
20
-
21
-
22
-
23
-
24
-
25
-
26
-
27
-
28
-
29
-
30
-
31
-
32
-
33
-
34
-
35
-
36
-
37
-
38
-
39
-
40
-
41
-
42
-
43
-
44
-
45
-
46
-
47
-
48
-
49
-
50
-
51
-
52
-
53
-
54
-
55
-
56
-
57
-
58
-
59
-
60
-
61
-
62
-
63
-
64
-
65
-
66
-
67
-
68
-
69
-
70
-
71
-
72
-
73
-
74
-
75
-
76
-
77
-
78
-
79
-
80
-
81
-
82
-
83
-
84
-
85
-
86
-
87
-
88
-
89
-
90
-
91
-
92
-
93
-
94
-
95
-
96
-
97
-
98
-
99
-
100
-
101
-
102
-
103
-
 104
104 -
 105
105 -
 106
106 -
 107
107 -
 108
108 -
 109
109 -
 110
110 -
 111
111 -
 112
112 -
 113
113 -
 114
114 -
115
-
116
-
117
-
118
-
119
-
120
-
121
-
122
-
123
-
124
-
125
-
126
-
127
-
128
-
129
-
130
-
131
-
132
-
133
-
134
-
135
-
136
-
137
-
138
-
139
-
140
-
141
-
142
-
143
-
144
-
145
-
146
-
147
-
148
-
149
-
150
-
151
-
152
-
153
-
154
-
155
-
156
-
157
-
158
-
159
-
160
-
161
-
162
-
163
-
164
-
165
-
166
-
167
-
168
-
169
-
170
-
171
-
172
-
173
-
174
-
175
-
176
-
177
-
178
-
179
-
180
-
181
-
182
-
183
-
184
-
185
-
186
-
187
-
188
-
189
-
190
-
191
-
192
-
193
-
194
-
195
-
196
-
197
-
198
-
199
-
200
-
201
-
202
-
203
-
204
-
205
-
206
-
207
-
208
-
209
-
210
-
211
-
212
-
213
-
214
-
215
-
216
-
217
-
218
-
219
-
220
-
221
-
222
-
223
-
224
-
225
-
226
-
227
-
228
-
229
-
230
-
231
-
232
-
233
-
234
-
235
-
236
-
237
-
238
-
239
-
240
-
241
-
242
-
243
-
244
-
245
-
246
-
247
-
248
-
249
-
250
-
251
-
252
-
253
-
254
-
255
-
256
-
257
-
258
-
259
-
260
-
261
-
262
-
263
-
264
-
265
-
266
-
267
-
268
-
269
-
270
-
271
-
272
-
273
-
274
-
275
-
276
-
277
-
278
-
279
-
280
-
281
-
282
-
283
-
284
-
285
-
286
-
287
-
288
 |
 |
