HP 2605 Service Manual - Page 149
Load Tray X, Non HP supply - color laserjet 2605dn manual
 |
View all HP 2605 manuals
Add to My Manuals
Save this manual to your list of manuals |
Page 149 highlights
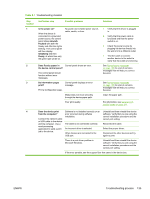
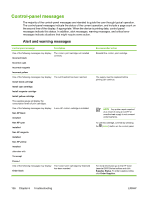
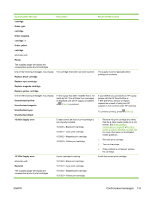
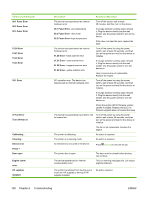
Control panel message Install supplies The supplies gauge will display the consumption levels of print cartridges. Invalid driver Invalid entry Jam in Cartridge area Jam in Output bin Jam in print paper path Jam in tray 2 Jam in tray 3 Load paper Load Tray X [TYPE] [SIZE] Manual feed Press Memory is low Press Misprint Press No paper pickup Press Non HP supply Description Multiple supplies are not installed. Recommended action Install correct print cartridges. You are using the incorrect printer driver. Invalid data or response. A jam has occurred in the print path. A jam has occurred in the output area. A jam has occurred in the print path. A jam has occurred in Tray 2. A jam has occurred in Tray 3. The HP Color LaserJet 2605, 2605dn, or 2605dtn printer is out of paper. The printer is processing job, but the tray indicated is empty. Reselect the printer driver appropriate for your device. Correct the entry. Open the door and clear the jam. Then press the (Select) button on the control panel. Clear the jam, and then press the (Select) button on the control panel. Open the door and clear the jam. Then press the (Select) button on the control panel. Clear the jam, and then press the (Select) button on the control panel. Clear the jam, and then press the (Select) button on the control panel. Please load specified paper type into the tray indicated. Please load specified paper type and size into the tray indicated. The printer is waiting for paper in the tray indicated. Load the paper as indicated. The device memory has been almost completely filled. The printed pages have been incorrectly placed on the paper. The print engine has failed to pick up a piece of media. A non-HP (cloned or refilled) supply has been installed and was overridden. Allow the device to finish the job, or press (Select) to cancel the job. Break the job into smaller jobs that contain fewer pages. To continue, press the (Select) button on the control panel. In Tray 1, verify that the media was inserted far enough into the tray. In Tray 2 or optional Tray 3, verify that the paper-length guide is in the correct position for the media size that you are using. Reload the media in the input tray and press (Select) to continue the job. If you believe you purchased an HP supply, please call the HP fraud hotline at ENWW Control-panel messages 139
-
 1
1 -
2
-
3
-
4
-
5
-
6
-
7
-
8
-
9
-
10
-
11
-
12
-
13
-
14
-
15
-
16
-
17
-
18
-
19
-
20
-
21
-
22
-
23
-
24
-
25
-
26
-
27
-
28
-
29
-
30
-
31
-
32
-
33
-
34
-
35
-
36
-
37
-
38
-
39
-
40
-
41
-
42
-
43
-
44
-
45
-
46
-
47
-
48
-
49
-
50
-
51
-
52
-
53
-
54
-
55
-
56
-
57
-
58
-
59
-
60
-
61
-
62
-
63
-
64
-
65
-
66
-
67
-
68
-
69
-
70
-
71
-
72
-
73
-
74
-
75
-
76
-
77
-
78
-
79
-
80
-
81
-
82
-
83
-
84
-
85
-
86
-
87
-
88
-
89
-
90
-
91
-
92
-
93
-
94
-
95
-
96
-
97
-
98
-
99
-
100
-
101
-
102
-
103
-
104
-
105
-
106
-
107
-
108
-
109
-
110
-
111
-
112
-
113
-
114
-
115
-
116
-
117
-
118
-
119
-
120
-
121
-
122
-
123
-
124
-
125
-
126
-
127
-
128
-
129
-
130
-
131
-
132
-
133
-
134
-
135
-
136
-
137
-
138
-
139
-
140
-
141
-
142
-
143
-
 144
144 -
 145
145 -
 146
146 -
 147
147 -
 148
148 -
 149
149 -
 150
150 -
 151
151 -
 152
152 -
 153
153 -
 154
154 -
155
-
156
-
157
-
158
-
159
-
160
-
161
-
162
-
163
-
164
-
165
-
166
-
167
-
168
-
169
-
170
-
171
-
172
-
173
-
174
-
175
-
176
-
177
-
178
-
179
-
180
-
181
-
182
-
183
-
184
-
185
-
186
-
187
-
188
-
189
-
190
-
191
-
192
-
193
-
194
-
195
-
196
-
197
-
198
-
199
-
200
-
201
-
202
-
203
-
204
-
205
-
206
-
207
-
208
-
209
-
210
-
211
-
212
-
213
-
214
-
215
-
216
-
217
-
218
-
219
-
220
-
221
-
222
-
223
-
224
-
225
-
226
-
227
-
228
-
229
-
230
-
231
-
232
-
233
-
234
-
235
-
236
-
237
-
238
-
239
-
240
-
241
-
242
-
243
-
244
-
245
-
246
-
247
-
248
-
249
-
250
-
251
-
252
-
253
-
254
-
255
-
256
-
257
-
258
-
259
-
260
-
261
-
262
-
263
-
264
-
265
-
266
-
267
-
268
 |
 |