HP 2605 Service Manual - Page 95
Service approach, Pre-service procedures, Control-panel, messages, Table, Replaceable, parts
 |
View all HP 2605 manuals
Add to My Manuals
Save this manual to your list of manuals |
Page 95 highlights
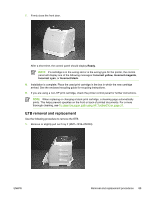
Service approach Field service on this printer is limited to a recommended time of 30 minutes, which includes troubleshooting, teardown, and repair. Repairs that require more time should not be made and the printer should be replaced. The following are the major internal assemblies that can be replaced on this printer: ● Fuser ● ETB ● DC controller ● Formatter ● Control-panel display If troubleshooting or a control-panel message indicates that the failure is not associated with one of these parts, do not attempt to repair the printer. Instead, replace the unit. For more information on messages that would indicate a printer needs to be replaced, see Control-panel messages on page 136 and Table 7-1 Replaceable parts on page 178. Pre-service procedures Follow the pre-service procedures before you perform service. 1. Use the power switch to turn off the printer. 2. Remove all media from the product. 3. Place the product on an ESD mat. If an ESD mat or an ESD-protected workstation is not available, discharge body static and ground the product chassis before servicing the product. 4. Remove the print cartridges. 5. Unplug the power cord and the interface cable. 6. Lift the printer off of optional Tray 3 (if it is installed). ENWW Service approach 85
-
 1
1 -
2
-
3
-
4
-
5
-
6
-
7
-
8
-
9
-
10
-
11
-
12
-
13
-
14
-
15
-
16
-
17
-
18
-
19
-
20
-
21
-
22
-
23
-
24
-
25
-
26
-
27
-
28
-
29
-
30
-
31
-
32
-
33
-
34
-
35
-
36
-
37
-
38
-
39
-
40
-
41
-
42
-
43
-
44
-
45
-
46
-
47
-
48
-
49
-
50
-
51
-
52
-
53
-
54
-
55
-
56
-
57
-
58
-
59
-
60
-
61
-
62
-
63
-
64
-
65
-
66
-
67
-
68
-
69
-
70
-
71
-
72
-
73
-
74
-
75
-
76
-
77
-
78
-
79
-
80
-
81
-
82
-
83
-
84
-
85
-
86
-
87
-
88
-
89
-
 90
90 -
 91
91 -
 92
92 -
 93
93 -
 94
94 -
 95
95 -
 96
96 -
 97
97 -
 98
98 -
 99
99 -
 100
100 -
101
-
102
-
103
-
104
-
105
-
106
-
107
-
108
-
109
-
110
-
111
-
112
-
113
-
114
-
115
-
116
-
117
-
118
-
119
-
120
-
121
-
122
-
123
-
124
-
125
-
126
-
127
-
128
-
129
-
130
-
131
-
132
-
133
-
134
-
135
-
136
-
137
-
138
-
139
-
140
-
141
-
142
-
143
-
144
-
145
-
146
-
147
-
148
-
149
-
150
-
151
-
152
-
153
-
154
-
155
-
156
-
157
-
158
-
159
-
160
-
161
-
162
-
163
-
164
-
165
-
166
-
167
-
168
-
169
-
170
-
171
-
172
-
173
-
174
-
175
-
176
-
177
-
178
-
179
-
180
-
181
-
182
-
183
-
184
-
185
-
186
-
187
-
188
-
189
-
190
-
191
-
192
-
193
-
194
-
195
-
196
-
197
-
198
-
199
-
200
-
201
-
202
-
203
-
204
-
205
-
206
-
207
-
208
-
209
-
210
-
211
-
212
-
213
-
214
-
215
-
216
-
217
-
218
-
219
-
220
-
221
-
222
-
223
-
224
-
225
-
226
-
227
-
228
-
229
-
230
-
231
-
232
-
233
-
234
-
235
-
236
-
237
-
238
-
239
-
240
-
241
-
242
-
243
-
244
-
245
-
246
-
247
-
248
-
249
-
250
-
251
-
252
-
253
-
254
-
255
-
256
-
257
-
258
-
259
-
260
-
261
-
262
-
263
-
264
-
265
-
266
-
267
-
268
 |
 |