HP 635n HP Jetdirect Print Servers - How to Use 802.1X on HP Jetdirect Print S - Page 58
Encryption Strength, Jetdirect Certificate, CA Certificate
 |
UPC - 882780301016
View all HP 635n manuals
Add to My Manuals
Save this manual to your list of manuals |
Page 58 highlights
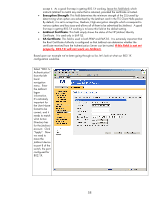
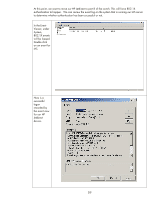
accept it. As a good first step in getting 802.1X working, leave this field blank which instructs Jetdirect to match any name that is returned, provided the certificate is trusted. • Encryption Strength: This field determines the minimum strength of the SSL tunnel by determining what ciphers are advertised by the Jetdirect card in the TLS Client Hello packet. By default, it is set to accept Low, Medium, High encryption strengths which correspond to various ciphers and key sizes and allows all of them to be advertised by Jetdirect. A good first step in getting 802.1X working is to leave this field at the default setting. • Jetdirect Certificate: This field simply shows the status of the HP Jetdirect Identity Certificate. It is used only in EAP-TLS. • CA Certificate: This field is used in both PEAP and EAP-TLS. It is extremely important that the Root Certificate Authority is configured so that Jetdirect can determine whether the certificate received from the Authentication Server can be trusted. If this field is not set properly, 802.1X will not work on Jetdirect. Based upon our example we've been going through so far, let's look at what our 802.1X configuration would be. Select "802.1x Authentication" from the left hand navigation menu. Enter the Jetdirect logon information. It's extremely important for the User Name format to be correct, and it needs to match what Active Directory has for the Jetdirect account. Click "Apply". Now we need to move the Jetdirect device to port 8 of the switch, the port configured for 802.1X. 58
-
 1
1 -
2
-
3
-
4
-
5
-
6
-
7
-
8
-
9
-
10
-
11
-
12
-
13
-
14
-
15
-
16
-
17
-
18
-
19
-
20
-
21
-
22
-
23
-
24
-
25
-
26
-
27
-
28
-
29
-
30
-
31
-
32
-
33
-
34
-
35
-
36
-
37
-
38
-
39
-
40
-
41
-
42
-
43
-
44
-
45
-
46
-
47
-
48
-
49
-
50
-
51
-
52
-
 53
53 -
 54
54 -
 55
55 -
 56
56 -
 57
57 -
 58
58 -
 59
59 -
 60
60 -
 61
61 -
 62
62 -
 63
63 -
64
-
65
-
66
-
67
-
68
-
69
-
70
-
71
-
72
-
73
-
74
-
75
-
76
-
77
-
78
-
79
-
80
-
81
-
82
-
83
-
84
-
85
-
86
-
87
-
88
-
89
-
90
-
91
-
92
-
93
-
94
-
95
-
96
-
97
-
98
-
99
-
100
-
101
 |
 |
