HP Brio 83xx HP BRIO 82XX and 83XX Series PCs - Hard Disk Drives - Page 37
Supported HP Accessories
 |
View all HP Brio 83xx manuals
Add to My Manuals
Save this manual to your list of manuals |
Page 37 highlights
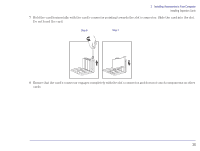
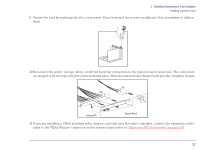
2 Installing Accessories in Your Computer Installing Expansion Cards 9 Secure the card by replacing the slot cover screw. If you loosened the screws on adjacent slots, remember to tighten them. 10 Reconnect the power, storage device, and front bezel fan connectors to the system board connectors. The connectors are shaped to fit one way only (they have indexing pins). Slide the system board drawer back into the computer chassis. PS PS2 PS1 Indexing Pin System Board 11 If you are installing a VESA-standard video adapter card that uses the video controller, connect the expansion card's cable to the VESA Feature Connector on the system board (refer to "Supported HP Accessories" on page 20). 37
-
 1
1 -
2
-
3
-
4
-
5
-
6
-
7
-
8
-
9
-
10
-
11
-
12
-
13
-
14
-
15
-
16
-
17
-
18
-
19
-
20
-
21
-
22
-
23
-
24
-
25
-
26
-
27
-
28
-
29
-
30
-
31
-
 32
32 -
 33
33 -
 34
34 -
 35
35 -
 36
36 -
 37
37 -
 38
38 -
 39
39 -
 40
40 -
 41
41 -
 42
42 -
43
-
44
-
45
-
46
-
47
-
48
-
49
-
50
-
51
-
52
-
53
-
54
-
55
-
56
-
57
-
58
-
59
-
60
-
61
-
62
-
63
-
64
-
65
-
66
 |
 |

37
2
Installing Accessories in Your Computer
Installing Expansion Cards
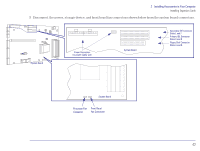
9
Secure the card by replacing the slot cover screw. If you loosened the screws on adjacent slots, remember to tighten
them.
10
Reconnect the power, storage device, and front bezel fan connectors to the system board connectors. The connectors
are shaped to fit one way only (they have indexing pins). Slide the system board drawer back into the computer chassis.
11
If you are installing a VESA-standard video adapter card that uses the video controller, connect the expansion card’s
cable to the VESA Feature Connector on the system board (refer to
“Supported HP Accessories” on page 20
).
Indexing Pin
PS1
PS2
System Board
PS