HP Brio 83xx HP BRIO 82XX and 83XX Series PCs - Hard Disk Drives - Page 52
Installing a Floppy Disk Drive, CD ROM Drive, Zip Drive, or Tape Drive
 |
View all HP Brio 83xx manuals
Add to My Manuals
Save this manual to your list of manuals |
Page 52 highlights
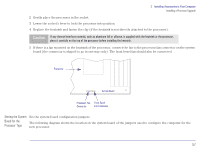
2 Installing Accessories in Your Computer Installing Storage Devices Installing a Floppy Disk Drive, CD-ROM Drive, Zip Drive, or Tape Drive 1 Remove the computer's cover (refer to "Removing the Cover" on page 23). 2 If the future location of the storage device is in one of the small storage device mounting bays (below the 3.5-inch floppy drive) at the front of the computer, you must pull out the system board from the back of the computer by 6 cm. This permits access to the mounting chassis for these storage devices. 3 Pull off the front bezel from the computer by 4 cm. Caution Be careful when pulling off the front bezel. If you pull the bezel off too far, you will pull the indicator lights out of their holders. 4 To allow access to the device, remove the relevant shelf cover plate (from the bezel) by popping out the shelf cover plate from the front bezel of the computer. Store it in a safe place. Step 3 Œ Œ Step 4 Inside View Cover Plate Front Bezel Ž 52
-
 1
1 -
2
-
3
-
4
-
5
-
6
-
7
-
8
-
9
-
10
-
11
-
12
-
13
-
14
-
15
-
16
-
17
-
18
-
19
-
20
-
21
-
22
-
23
-
24
-
25
-
26
-
27
-
28
-
29
-
30
-
31
-
32
-
33
-
34
-
35
-
36
-
37
-
38
-
39
-
40
-
41
-
42
-
43
-
44
-
45
-
46
-
 47
47 -
 48
48 -
 49
49 -
 50
50 -
 51
51 -
 52
52 -
 53
53 -
 54
54 -
 55
55 -
 56
56 -
 57
57 -
58
-
59
-
60
-
61
-
62
-
63
-
64
-
65
-
66
 |
 |
