HP Brio 83xx HP BRIO 82XX and 83XX Series PCs - Hard Disk Drives - Page 57
Caution, Setting the System, Board for the, Processor Type
 |
View all HP Brio 83xx manuals
Add to My Manuals
Save this manual to your list of manuals |
Page 57 highlights
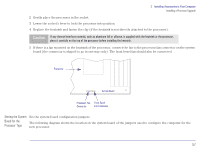
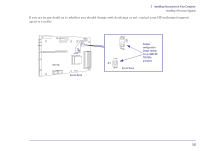
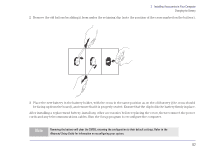
2 Installing Accessories in Your Computer Installing a Processor Upgrade 2 Gently place the processor in the socket. 3 Lower the socket's lever to lock the processor into position. 4 Replace the heatsink and fasten the clip (if the heatsink is not directly attached to the processor). Caution If any thermal interface material, such as aluminum foil or silicone, is supplied with the heatsink or the processor, place it carefully on the top of the processor before installing the heatsink. 5 If there is a fan mounted on the heatsink of the processor, connect the fan to the processor fan connector on the system board (the connector is shaped to go in one way only). The front bezel fan should also be connected. Processor System Board Processor Fan Front Bezel Connector Fan Connector Setting the System Set the system board configuration jumpers. Board for the Processor Type The following diagram shows the location on the system board of the jumpers used to configure the computer for the new processor. 57
-
 1
1 -
2
-
3
-
4
-
5
-
6
-
7
-
8
-
9
-
10
-
11
-
12
-
13
-
14
-
15
-
16
-
17
-
18
-
19
-
20
-
21
-
22
-
23
-
24
-
25
-
26
-
27
-
28
-
29
-
30
-
31
-
32
-
33
-
34
-
35
-
36
-
37
-
38
-
39
-
40
-
41
-
42
-
43
-
44
-
45
-
46
-
47
-
48
-
49
-
50
-
51
-
 52
52 -
 53
53 -
 54
54 -
 55
55 -
 56
56 -
 57
57 -
 58
58 -
 59
59 -
 60
60 -
 61
61 -
 62
62 -
63
-
64
-
65
-
66
 |
 |
