HP Color LaserJet Enterprise MFP M680 User Guide 1 - Page 176
Check the color settings, Check the image-adjustment settings, Optimize scan quality for text or
 |
View all HP Color LaserJet Enterprise MFP M680 manuals
Add to My Manuals
Save this manual to your list of manuals |
Page 176 highlights
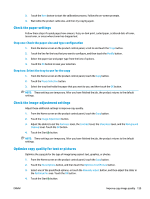
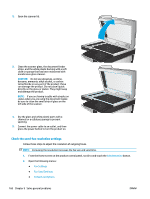
4. Open the Default Job Options menu. 5. Touch the Resolution button. 6. Select one of the predefined options. Touch the Save button. 7. Touch the Start button. Check the color settings Follow these steps to adjust the color setting: 1. From the Home screen on the product control panel, scroll to and touch the Administration button. 2. Open the Scan/Digital Send Settings menu. 3. Select the category of scan and send settings that you want to configure. 4. Open the Default Job Options menu. 5. Touch the Color/Black button. 6. Select one of the predefined options. Touch the Save button. 7. Touch the Start button. Check the image-adjustment settings Adjust these additional settings to improve scan quality. 1. From the Home screen on the product control panel, scroll to and touch the Administration button. 2. Open the Scan/Digital Send Settings menu. 3. Select the category of scan and send settings that you want to configure. 4. Open the Default Job Options menu. 5. Touch the Image Adjustment button. 6. Adjust the sliders to set the Darkness level, the Contrast level, the Sharpness level, and the Background Cleanup level. Touch the Save button. 7. Touch the Start button. NOTE: These settings are temporary. After you have finished the job, the product returns to the default settings. Optimize scan quality for text or pictures Optimize the scan job for the type of image being scanned: text, graphics, or photos. 1. From the Home screen on the product control panel, touch one of the buttons for the scan/send features: ● Save to Network Folder ● Save to Device Memory 164 Chapter 9 Solve general problems ENWW
-
 1
1 -
2
-
3
-
4
-
5
-
6
-
7
-
8
-
9
-
10
-
11
-
12
-
13
-
14
-
15
-
16
-
17
-
18
-
19
-
20
-
21
-
22
-
23
-
24
-
25
-
26
-
27
-
28
-
29
-
30
-
31
-
32
-
33
-
34
-
35
-
36
-
37
-
38
-
39
-
40
-
41
-
42
-
43
-
44
-
45
-
46
-
47
-
48
-
49
-
50
-
51
-
52
-
53
-
54
-
55
-
56
-
57
-
58
-
59
-
60
-
61
-
62
-
63
-
64
-
65
-
66
-
67
-
68
-
69
-
70
-
71
-
72
-
73
-
74
-
75
-
76
-
77
-
78
-
79
-
80
-
81
-
82
-
83
-
84
-
85
-
86
-
87
-
88
-
89
-
90
-
91
-
92
-
93
-
94
-
95
-
96
-
97
-
98
-
99
-
100
-
101
-
102
-
103
-
104
-
105
-
106
-
107
-
108
-
109
-
110
-
111
-
112
-
113
-
114
-
115
-
116
-
117
-
118
-
119
-
120
-
121
-
122
-
123
-
124
-
125
-
126
-
127
-
128
-
129
-
130
-
131
-
132
-
133
-
134
-
135
-
136
-
137
-
138
-
139
-
140
-
141
-
142
-
143
-
144
-
145
-
146
-
147
-
148
-
149
-
150
-
151
-
152
-
153
-
154
-
155
-
156
-
157
-
158
-
159
-
160
-
161
-
162
-
163
-
164
-
165
-
166
-
167
-
168
-
169
-
170
-
 171
171 -
 172
172 -
 173
173 -
 174
174 -
 175
175 -
 176
176 -
 177
177 -
 178
178 -
 179
179 -
 180
180 -
 181
181 -
182
-
183
-
184
-
185
-
186
-
187
-
188
-
189
-
190
-
191
-
192
-
193
-
194
-
195
-
196
 |
 |