HP DesignJet Z6 User Guide - Page 182
Lines are blurred, Line lengths are inaccurate, Heavyweight Coated Paper
 |
View all HP DesignJet Z6 manuals
Add to My Manuals
Save this manual to your list of manuals |
Page 182 highlights
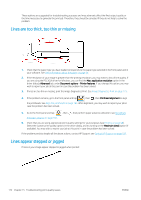
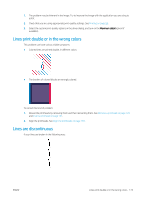
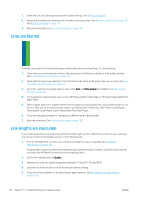
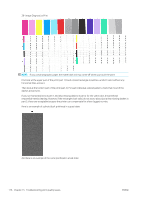
1. Check that you are using appropriate print-quality settings. See Printing on page 59. 2. Reseat the printheads by removing them and then reinserting them. See Remove a printhead on page 129 and Insert a printhead on page 131. 3. Align the printheads. See Align the printheads on page 183. Lines are blurred Humidity can cause ink to soak into the paper, making the lines blurred and fuzzy. Try the following: 1. Check that your environmental conditions (temperature, humidity) are suitable for high-quality printing. See Environmental specifications on page 197. 2. Check that the paper type selected in the front panel is the same as the paper type you are using. See View information about the paper on page 35. 3. Select the custom print-quality options, then select Best and More passes (if available). See High-quality printing on page 68. 4. Try changing to a heavier paper type, such as HP Heavyweight Coated Paper or HP Super Heavyweight Plus Matte Paper. 5. Select a paper type that is slightly thinner than the paper you have loaded; this will cause the printer to use less ink. Here are some example paper types in ascending order of thickness: Plain Paper, Coated Paper, Heavyweight Coated Paper, Super Heavyweight Plus Matte Paper. 6. If you are using glossy paper, try changing to a different type of glossy paper. 7. Align the printheads. See Align the printheads on page 183. Line lengths are inaccurate If you have measured your printed lines and find that the lengths are not sufficiently accurate for your purposes, you can try to improve line length accuracy in the following ways: 1. Print on HP Matte Film, for which your printer's line length accuracy is specified. See Functional specifications on page 196. Polyester film is about ten times more dimensionally stable than paper. However, using film that is thinner or thicker than HP Matte Film will reduce line length accuracy. 2. Set the Print Quality slider to Quality. 3. Maintain the room at a steady temperature between 10 and 30°C (50 and 86°F). 4. Load the roll of film and let it rest for five minutes before printing. 5. If you are still not satisfied, try recalibrating the paper advance. See Recalibrate the paper advance on page 160. 174 Chapter 15 Troubleshooting print-quality issues ENWW
-
 1
1 -
2
-
3
-
4
-
5
-
6
-
7
-
8
-
9
-
10
-
11
-
12
-
13
-
14
-
15
-
16
-
17
-
18
-
19
-
20
-
21
-
22
-
23
-
24
-
25
-
26
-
27
-
28
-
29
-
30
-
31
-
32
-
33
-
34
-
35
-
36
-
37
-
38
-
39
-
40
-
41
-
42
-
43
-
44
-
45
-
46
-
47
-
48
-
49
-
50
-
51
-
52
-
53
-
54
-
55
-
56
-
57
-
58
-
59
-
60
-
61
-
62
-
63
-
64
-
65
-
66
-
67
-
68
-
69
-
70
-
71
-
72
-
73
-
74
-
75
-
76
-
77
-
78
-
79
-
80
-
81
-
82
-
83
-
84
-
85
-
86
-
87
-
88
-
89
-
90
-
91
-
92
-
93
-
94
-
95
-
96
-
97
-
98
-
99
-
100
-
101
-
102
-
103
-
104
-
105
-
106
-
107
-
108
-
109
-
110
-
111
-
112
-
113
-
114
-
115
-
116
-
117
-
118
-
119
-
120
-
121
-
122
-
123
-
124
-
125
-
126
-
127
-
128
-
129
-
130
-
131
-
132
-
133
-
134
-
135
-
136
-
137
-
138
-
139
-
140
-
141
-
142
-
143
-
144
-
145
-
146
-
147
-
148
-
149
-
150
-
151
-
152
-
153
-
154
-
155
-
156
-
157
-
158
-
159
-
160
-
161
-
162
-
163
-
164
-
165
-
166
-
167
-
168
-
169
-
170
-
171
-
172
-
173
-
174
-
175
-
176
-
 177
177 -
 178
178 -
 179
179 -
 180
180 -
 181
181 -
 182
182 -
 183
183 -
 184
184 -
 185
185 -
 186
186 -
 187
187 -
188
-
189
-
190
-
191
-
192
-
193
-
194
-
195
-
196
-
197
-
198
-
199
-
200
-
201
-
202
-
203
-
204
-
205
-
206
-
207
-
208
-
209
-
210
-
211
-
212
-
213
 |
 |
