HP DesignJet Z6 User Guide - Page 185
Corrective action, If you still have a problem
 |
View all HP DesignJet Z6 manuals
Add to My Manuals
Save this manual to your list of manuals |
Page 185 highlights
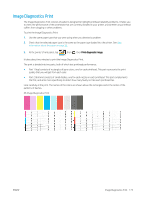
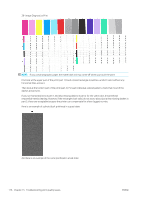
Corrective action 1. Clean any faulty printheads (see Clean the printheads on page 180). If you are unsure of which printhead to clean, select Clean all. Then reprint the Image Diagnostics Print to see whether the problem has been solved. 2. If the problem remains, clean the printheads again, and reprint the Image Diagnostics Print to see whether the problem has been solved. 3. If the problem remains, consider cleaning your printheads manually (see Clean the printheads on page 180). You could also try reprinting your current print job, in case it now prints satisfactorily. 4. If the problem remains, try cleaning the printhead drop detector. The printer normally notifies you when this is necessary, but it may be worth trying even if the printer has not suggested it. See Clean the printhead drop detector on page 181. 5. If the problem still remains, replace any persistently faulty printheads (see Handling ink cartridges and printheads on page 124), or contact HP Support (see Contact HP Support on page 193). If you still have a problem If you still experience print-quality problems after applying the advice in this chapter, here are some further things that you can do: ● Try using a higher print-quality option. See Printing on page 59. ● Check the driver you are using to print with. If it is a non-HP driver, consult the driver vendor about the problem. You could also try using the correct HP driver, if feasible. The latest HP drivers can be downloaded from http://www.hp.com/go/Z6/drivers (if you have a Z6) or http://www.hp.com/go/Z9/drivers (if you have a Z9+). ● If you are not sure which printhead to clean, select Clean all. ● If you are using a non-HP RIP, its settings may be incorrect. See the documentation that came with the RIP. ● Check that your printer's firmware is up to date. See Update the firmware on page 137. ● Check that you have the right settings in your software application. ENWW If you still have a problem 177
-
 1
1 -
2
-
3
-
4
-
5
-
6
-
7
-
8
-
9
-
10
-
11
-
12
-
13
-
14
-
15
-
16
-
17
-
18
-
19
-
20
-
21
-
22
-
23
-
24
-
25
-
26
-
27
-
28
-
29
-
30
-
31
-
32
-
33
-
34
-
35
-
36
-
37
-
38
-
39
-
40
-
41
-
42
-
43
-
44
-
45
-
46
-
47
-
48
-
49
-
50
-
51
-
52
-
53
-
54
-
55
-
56
-
57
-
58
-
59
-
60
-
61
-
62
-
63
-
64
-
65
-
66
-
67
-
68
-
69
-
70
-
71
-
72
-
73
-
74
-
75
-
76
-
77
-
78
-
79
-
80
-
81
-
82
-
83
-
84
-
85
-
86
-
87
-
88
-
89
-
90
-
91
-
92
-
93
-
94
-
95
-
96
-
97
-
98
-
99
-
100
-
101
-
102
-
103
-
104
-
105
-
106
-
107
-
108
-
109
-
110
-
111
-
112
-
113
-
114
-
115
-
116
-
117
-
118
-
119
-
120
-
121
-
122
-
123
-
124
-
125
-
126
-
127
-
128
-
129
-
130
-
131
-
132
-
133
-
134
-
135
-
136
-
137
-
138
-
139
-
140
-
141
-
142
-
143
-
144
-
145
-
146
-
147
-
148
-
149
-
150
-
151
-
152
-
153
-
154
-
155
-
156
-
157
-
158
-
159
-
160
-
161
-
162
-
163
-
164
-
165
-
166
-
167
-
168
-
169
-
170
-
171
-
172
-
173
-
174
-
175
-
176
-
177
-
178
-
179
-
 180
180 -
 181
181 -
 182
182 -
 183
183 -
 184
184 -
 185
185 -
 186
186 -
 187
187 -
 188
188 -
 189
189 -
 190
190 -
191
-
192
-
193
-
194
-
195
-
196
-
197
-
198
-
199
-
200
-
201
-
202
-
203
-
204
-
205
-
206
-
207
-
208
-
209
-
210
-
211
-
212
-
213
 |
 |