HP Designjet 4200 HP Designjet 4200 Scanner - User Guide - Page 90
glue mark arrows, rightmost panel B on top of the panel on its left A. The second
 |
View all HP Designjet 4200 manuals
Add to My Manuals
Save this manual to your list of manuals |
Page 90 highlights
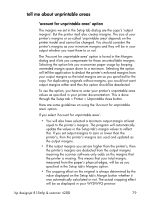
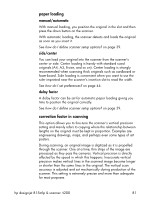
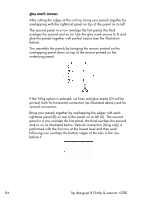
glue mark arrows After cutting the edges at the cut line, bring your panels together by overlapping with the rightmost panel on top of the panel on its left. The second panel in a row overlaps the first panel, the third overlaps the second and so on. Use the glue mark arrows to fit and glue the panels together with perfect seams (see the illustration below). You assemble the panels by bringing the arrows printed on the overlapping panel down on top of the arrows printed on the underlying panel. If the Tiling option is selected, cut lines and glue marks (D) will be printed, both for horizontal connection (as illustrated above) and for vertical connection. Bring your panels together by overlapping the edges with each rightmost panel (B) on top of the panel on its left (A). The second panel in a row overlaps the first panel; the third overlaps the second and so on as illustrated below. Vertical connection (tiling only) is performed with the first row at the lowest level and then each following row overlaps the bottom edges of the tiles in the row before it. 84 hp designjet 815mfp & scanner 4200
-
 1
1 -
2
-
3
-
4
-
5
-
6
-
7
-
8
-
9
-
10
-
11
-
12
-
13
-
14
-
15
-
16
-
17
-
18
-
19
-
20
-
21
-
22
-
23
-
24
-
25
-
26
-
27
-
28
-
29
-
30
-
31
-
32
-
33
-
34
-
35
-
36
-
37
-
38
-
39
-
40
-
41
-
42
-
43
-
44
-
45
-
46
-
47
-
48
-
49
-
50
-
51
-
52
-
53
-
54
-
55
-
56
-
57
-
58
-
59
-
60
-
61
-
62
-
63
-
64
-
65
-
66
-
67
-
68
-
69
-
70
-
71
-
72
-
73
-
74
-
75
-
76
-
77
-
78
-
79
-
80
-
81
-
82
-
83
-
84
-
 85
85 -
 86
86 -
 87
87 -
 88
88 -
 89
89 -
 90
90 -
 91
91 -
 92
92 -
 93
93 -
 94
94 -
 95
95 -
96
-
97
-
98
-
99
-
100
-
101
-
102
-
103
-
104
-
105
-
106
-
107
-
108
-
109
-
110
 |
 |