HP Deskjet 1280 HP Deskjet 1280 - User Guide - Page 11
Using the printer on a network, For Windows - windows 7 driver
 |
View all HP Deskjet 1280 manuals
Add to My Manuals
Save this manual to your list of manuals |
Page 11 highlights
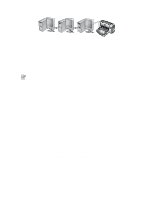
Using the printer on a network Your printer can be shared in a network environment by connecting it directly to a network via an optional HP Jetdirect external print server. For information about setting up HP Jetdirect print servers, see your HP Jetdirect hardware and software installation guides. For Windows Installing the printer driver through network using the printer setup program You must install your HP Jetdirect print server first, then connect the printer to the network and install the printer software. 1 Connect the network cable between the HP Jetdirect print server and a network port. 2 Start Windows and make sure no other Windows applications are running. 3 Insert the Starter CD into the CD-ROM drive. The CD menu runs automatically. If the CD menu does not run automatically, click Start, click Run, and in the command line box type the letter of your computer's CD-ROM drive followed by :\setup (for example, type D:\setup). 4 Click Install Printer Driver from the CD menu. 5 Choose your language and click OK. 6 Follow the onscreen instructions. 7 Click Connected via the network, and then click Next. 8 Click Client setup for client-server printing, and then click Next. 9 Follow the onscreen instructions to complete the installation. Installing the printer driver through network using Add Printer 1 Click Start, point to Settings, and then click Printers (Windows NT 4.0, 98, Me, and 2000) or Printers and Faxes (Windows XP). 2 Double-click Add Printer, and then click Next. 3 For Windows 98, Me, 2000, or XP, select Network Printer. -OrFor Windows NT 4.0, select Network Printer Server. 4 Click Next. ENWW 2-4
-
 1
1 -
2
-
3
-
4
-
5
-
 6
6 -
 7
7 -
 8
8 -
 9
9 -
 10
10 -
 11
11 -
 12
12 -
 13
13 -
 14
14 -
 15
15 -
 16
16 -
17
-
18
-
19
-
20
-
21
-
22
-
23
-
24
-
25
-
26
-
27
-
28
-
29
-
30
-
31
-
32
-
33
-
34
-
35
-
36
-
37
-
38
-
39
-
40
-
41
-
42
-
43
-
44
-
45
-
46
-
47
-
48
-
49
-
50
-
51
-
52
-
53
-
54
-
55
-
56
-
57
-
58
-
59
-
60
-
61
-
62
-
63
-
64
 |
 |