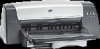
HP Deskjet 1280 HP Deskjet 1280 - User Guide - Page 25
Understanding smart software features, Print in Sepia and Print in Grayscale Windows only - windows 7 drivers
 |
View all HP Deskjet 1280 manuals
Add to My Manuals
Save this manual to your list of manuals |
Page 25 highlights
Understanding smart software features Your printer driver provides the following smart software features. For more details on how to use these features, see the driver online help. Resizing Options Enlarge or reduce the size of your documents with virtually no loss in print quality or resolution. On the Effects tab, select the Print Document On check box, and then select the desired document size, followed by the Scale to Fit check box. Alternatively, you can make use of the % of Normal Size scroll bar to adjust the document size. You can zoom from 25 to 400 percent of the original document size, but page content might get truncated at times. Print on Both Sides (Windows only) Print on both sides of the paper to create professional looking brochures and catalogues. On the Finishing tab, select the Print on Both Sides check box. If you wish to bind the printouts by the top, also select the Flip Pages Up check box. Booklet Layout is (Windows only) Produce booklets without worrying about pagination. This feature is available only when Print on Both Sides on the Finishing tab is selected. All you need to do is fold the pages and bind them into a booklet. You can choose to bind the booklet on the left or the right side by selecting the left or the right edge binding. Pages per Sheet Arrange up to 16 pages on a single sheet of paper to reduce printing costs. You can arrange the order of the layout with the Page Order is selections. On the Finishing tab, select two or more pages from the Pages per Sheet drop-down list, and then select the desired layout order from the Page Order is drop-down list. Tiling (Windows only) Take a one-page document and enlarge it up to five times (5 x 5) for documents up to A3+ (13 by 19 in.) size. The enlarged document can be printed on several sheets and assembled to form a large billboard. On the Finishing tab, select the number of tiles you wish to create. Mirror Image Flip a page horizontally. This lets you write on the underside of a transparency film, leaving the topside available for annotations with marker pens. On the Basics tab, select the Mirror Image check box. Banner printing Print large images and bold, oversized fonts on continuous feeds of paper. On the Paper/ Quality tab, select HP Banner Paper from the Type is drop-down list. Print in Sepia and Print in Grayscale (Windows only) Print images in a brownish tone to give them an antique look using the Print in Sepia feature. Alternatively, print in grayscale by selecting Print in Grayscale. Both black and white and color documents can be converted to exhibit this effect. ENWW 3-10
-
 1
1 -
2
-
3
-
4
-
5
-
6
-
7
-
8
-
9
-
10
-
11
-
12
-
13
-
14
-
15
-
16
-
17
-
18
-
19
-
 20
20 -
 21
21 -
 22
22 -
 23
23 -
 24
24 -
 25
25 -
 26
26 -
 27
27 -
 28
28 -
 29
29 -
 30
30 -
31
-
32
-
33
-
34
-
35
-
36
-
37
-
38
-
39
-
40
-
41
-
42
-
43
-
44
-
45
-
46
-
47
-
48
-
49
-
50
-
51
-
52
-
53
-
54
-
55
-
56
-
57
-
58
-
59
-
60
-
61
-
62
-
63
-
64
 |
 |
