HP Deskjet 1280 HP Deskjet 1280 - User Guide - Page 12
Changing print settings, Connecting to a print server - software
 |
View all HP Deskjet 1280 manuals
Add to My Manuals
Save this manual to your list of manuals |
Page 12 highlights
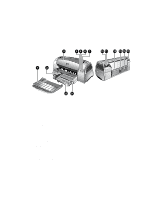
5 Do one of the following steps: • Type in the network path or queue name of the shared printer and click Next. Click Have Disk when prompted to select the printer model. • Click Next and locate the printer in the Shared printers list. 6 Click Next and follow the onscreen instructions to complete the installation. Connecting to a print server You must install your HP Jetdirect print server first, then connect the printer to the network and install the printer software. 1 Click Start, point to Settings, and then click Printers (Windows NT 4.0, 98, Me, and 2000) or Printers and Faxes (Windows XP). 2 Right-click the printer icon in the Printers folder and select Properties. 3 Do one of the following: • For Windows NT 4.0, 2000, and XP: Click the Ports tab, and then click Add Port. • For Windows 98 and Me: Click the Details tab, and then click Add Port. 4 Select the desired port (such as the HP Standard TCP/IP Port) and click the New Port button. 5 Click Next and follow the onscreen instructions to complete the connection. Changing print settings For Windows: You can access the printing features and change the default print settings from the Printers folder: 1 Click Start, point to Settings, and then click Printers (Windows NT 4.0, 98, Me, and 2000) or Printers and Faxes (Windows XP). 2 Right-click the printer icon in the Printers folder and select Properties (Windows 98 or Me), Document Defaults (Windows NT 4.0), or Printing Preferences (Windows 2000 or XP). To change the current print settings, access the Print dialog box of the application you are using (typically done by clicking the File menu, clicking Print, and then clicking Properties). For Macintosh: To change print settings, click the File menu, and then click Page Setup or Print. 2-5 ENWW
-
 1
1 -
2
-
3
-
4
-
5
-
6
-
 7
7 -
 8
8 -
 9
9 -
 10
10 -
 11
11 -
 12
12 -
 13
13 -
 14
14 -
 15
15 -
 16
16 -
 17
17 -
18
-
19
-
20
-
21
-
22
-
23
-
24
-
25
-
26
-
27
-
28
-
29
-
30
-
31
-
32
-
33
-
34
-
35
-
36
-
37
-
38
-
39
-
40
-
41
-
42
-
43
-
44
-
45
-
46
-
47
-
48
-
49
-
50
-
51
-
52
-
53
-
54
-
55
-
56
-
57
-
58
-
59
-
60
-
61
-
62
-
63
-
64
 |
 |