HP Disk System 2300 HP StorageWorks Disk System 2300 User's Guide(This manual - Page 138
Reinstalling the deskside base and external covers on the disk, system.
 |
View all HP Disk System 2300 manuals
Add to My Manuals
Save this manual to your list of manuals |
Page 138 highlights
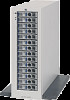
Reinstalling the deskside base and external covers on the disk system. 1 Place the deskside external cover on its top, on a sturdy surface. 2 Lift the disk system chassis into the cover, onto the alignment pins. The disk system should be installed into the cover with the power switch down (toward the closed part of the cover). 3 Secure the base to the cover using four M5 screws. Tighten the screws using a Torx T25 driver. They are the four screws that are closest to the edges of the base. 4 Secure the base to the chassis using four M5 screws. Tighten the screws using a Torx T25 driver. They are the four screws that are closest to the edges of the base. 138 Removal and Replacement
-
 1
1 -
2
-
3
-
4
-
5
-
6
-
7
-
8
-
9
-
10
-
11
-
12
-
13
-
14
-
15
-
16
-
17
-
18
-
19
-
20
-
21
-
22
-
23
-
24
-
25
-
26
-
27
-
28
-
29
-
30
-
31
-
32
-
33
-
34
-
35
-
36
-
37
-
38
-
39
-
40
-
41
-
42
-
43
-
44
-
45
-
46
-
47
-
48
-
49
-
50
-
51
-
52
-
53
-
54
-
55
-
56
-
57
-
58
-
59
-
60
-
61
-
62
-
63
-
64
-
65
-
66
-
67
-
68
-
69
-
70
-
71
-
72
-
73
-
74
-
75
-
76
-
77
-
78
-
79
-
80
-
81
-
82
-
83
-
84
-
85
-
86
-
87
-
88
-
89
-
90
-
91
-
92
-
93
-
94
-
95
-
96
-
97
-
98
-
99
-
100
-
101
-
102
-
103
-
104
-
105
-
106
-
107
-
108
-
109
-
110
-
111
-
112
-
113
-
114
-
115
-
116
-
117
-
118
-
119
-
120
-
121
-
122
-
123
-
124
-
125
-
126
-
127
-
128
-
129
-
130
-
131
-
132
-
 133
133 -
 134
134 -
 135
135 -
 136
136 -
 137
137 -
 138
138 -
 139
139 -
 140
140 -
 141
141 -
 142
142 -
 143
143 -
144
-
145
-
146
-
147
-
148
-
149
-
150
-
151
-
152
-
153
-
154
-
155
-
156
-
157
-
158
 |
 |

138
Removal and Replacement
Reinstalling the deskside base and external covers on the disk
system.
1
Place the deskside external cover on its top, on
a sturdy surface.
2
Lift the disk system chassis into the cover, onto the alignment pins. The disk
system should be installed into the cover with the power switch down (toward
the closed part of the cover).
3
Secure the base to the cover using four M5 screws. Tighten the screws using a
Torx T25 driver. They are the four screws that are closest to the edges of the
base.
4
Secure the base to the chassis using four M5 screws. Tighten the screws using
a Torx T25 driver. They are the four screws that are closest to the edges of the
base.