HP Disk System 2300 HP StorageWorks Disk System 2300 User's Guide(This manual - Page 139
the end cap with the end cap slots. Insert and tighten the M5 retaining screws
 |
View all HP Disk System 2300 manuals
Add to My Manuals
Save this manual to your list of manuals |
Page 139 highlights
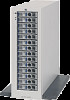
Removal and Replacement 5 Rotate the disk system and place it on the back end of the disk system. The empty disk module slots should be facing up. 6 Align the end cap tabs into the appropriate slots at the top of the disk system. 7 Rotate the end cap down over the base, aligning the small tabs at the top of the end cap with the end cap slots. Insert and tighten the M5 retaining screws using the Torx T25 driver. Be sure the retaining screw holes are aligned (see Figure 67). Removal and Replacement 139
-
 1
1 -
2
-
3
-
4
-
5
-
6
-
7
-
8
-
9
-
10
-
11
-
12
-
13
-
14
-
15
-
16
-
17
-
18
-
19
-
20
-
21
-
22
-
23
-
24
-
25
-
26
-
27
-
28
-
29
-
30
-
31
-
32
-
33
-
34
-
35
-
36
-
37
-
38
-
39
-
40
-
41
-
42
-
43
-
44
-
45
-
46
-
47
-
48
-
49
-
50
-
51
-
52
-
53
-
54
-
55
-
56
-
57
-
58
-
59
-
60
-
61
-
62
-
63
-
64
-
65
-
66
-
67
-
68
-
69
-
70
-
71
-
72
-
73
-
74
-
75
-
76
-
77
-
78
-
79
-
80
-
81
-
82
-
83
-
84
-
85
-
86
-
87
-
88
-
89
-
90
-
91
-
92
-
93
-
94
-
95
-
96
-
97
-
98
-
99
-
100
-
101
-
102
-
103
-
104
-
105
-
106
-
107
-
108
-
109
-
110
-
111
-
112
-
113
-
114
-
115
-
116
-
117
-
118
-
119
-
120
-
121
-
122
-
123
-
124
-
125
-
126
-
127
-
128
-
129
-
130
-
131
-
132
-
133
-
 134
134 -
 135
135 -
 136
136 -
 137
137 -
 138
138 -
 139
139 -
 140
140 -
 141
141 -
 142
142 -
 143
143 -
 144
144 -
145
-
146
-
147
-
148
-
149
-
150
-
151
-
152
-
153
-
154
-
155
-
156
-
157
-
158
 |
 |

Removal and Replacement
139
Removal and Replacement
5
Rotate the disk system and place it on the back end of the disk system. The
empty disk module slots should be facing up.
6
Align the end cap tabs into the appropriate slots at the top of the disk system.
7
Rotate the end cap down over the base, aligning the small tabs at the top of
the end cap with the end cap slots. Insert and tighten the M5 retaining screws
using the Torx T25 driver. Be sure the retaining screw holes are aligned (see
Figure 67).