HP LaserJet Pro MFP 3101-3108fdne User Guide - Page 89
Rename the printer on a network, Manually con IPv4 TCP/IP parameters
 |
View all HP LaserJet Pro MFP 3101-3108fdne manuals
Add to My Manuals
Save this manual to your list of manuals |
Page 89 highlights
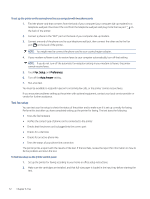
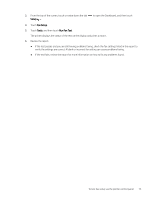
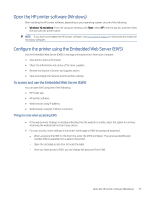
1. Open the EWS. See Configure the printer using the Embedded Web Server (EWS). 2. Click the Network tab to obtain network information. Change settings as needed. Rename the printer on a network To rename the printer on a network so that it can be uniquely identified, use the Embedded Web Server. 1. Open the EWS. See Configure the printer using the Embedded Web Server (EWS). 2. Click the Network tab. 3. From the left menu, click General. 4. Click Network Identification and change the hostname. 5. Make any necessary changes and click Apply. Manually configure IPv4 TCP/IP parameters Use the EWS to manually set an IPv4 address, subnet mask, and default gateway. 1. Open the EWS. See Configure the printer using the Embedded Web Server (EWS). 2. Click the Network tab. 3. From the left menu, click Wired. 4. Click IPv4 Configuration and make the necessary changes. 5. Click Apply. Assign or change the system password using the Embedded Web Server Assign an administrator password for access to the printer and the HP Embedded Web Server so that unauthorized users cannot change the printer settings. 1. Open the EWS. See Configure the printer using the Embedded Web Server (EWS). 2. Click Settings tab. 3. From the left menu, click Security. 4. Click Password Settings and make the necessary changes. 5. Click Apply. NOTE: Make note of the password and store it in a safe place. Change energy-conservation settings The printer includes several economic features to conserve energy and supplies. Set the Sleep Mode time Use the EWS to set the amount of idle time before the printer enters sleep mode. 1. Open the EWS. See Configure the printer using the Embedded Web Server (EWS). 2. Click the Settings tab. Rename the printer on a network 77
-
 1
1 -
2
-
3
-
4
-
5
-
6
-
7
-
8
-
9
-
10
-
11
-
12
-
13
-
14
-
15
-
16
-
17
-
18
-
19
-
20
-
21
-
22
-
23
-
24
-
25
-
26
-
27
-
28
-
29
-
30
-
31
-
32
-
33
-
34
-
35
-
36
-
37
-
38
-
39
-
40
-
41
-
42
-
43
-
44
-
45
-
46
-
47
-
48
-
49
-
50
-
51
-
52
-
53
-
54
-
55
-
56
-
57
-
58
-
59
-
60
-
61
-
62
-
63
-
64
-
65
-
66
-
67
-
68
-
69
-
70
-
71
-
72
-
73
-
74
-
75
-
76
-
77
-
78
-
79
-
80
-
81
-
82
-
83
-
 84
84 -
 85
85 -
 86
86 -
 87
87 -
 88
88 -
 89
89 -
 90
90 -
 91
91 -
 92
92 -
 93
93 -
 94
94 -
95
-
96
-
97
-
98
-
99
-
100
-
101
-
102
-
103
-
104
-
105
-
106
-
107
-
108
-
109
-
110
-
111
-
112
-
113
-
114
-
115
-
116
-
117
-
118
-
119
-
120
-
121
-
122
-
123
-
124
-
125
-
126
-
127
-
128
-
129
-
130
-
131
-
132
-
133
-
134
-
135
-
136
-
137
-
138
-
139
-
140
-
141
-
142
-
143
-
144
-
145
-
146
-
147
-
148
-
149
-
150
-
151
-
152
-
153
-
154
-
155
-
156
-
157
-
158
-
159
-
160
-
161
-
162
-
163
-
164
-
165
-
166
-
167
-
168
-
169
-
170
-
171
 |
 |
