HP LaserJet Pro MFP M329 User Guide - Page 188
Download, Send Firmware, Fax Speed, Speed-Slow 9600 bps, Setup, Preferences
 |
View all HP LaserJet Pro MFP M329 manuals
Add to My Manuals
Save this manual to your list of manuals |
Page 188 highlights
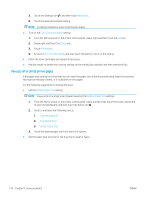
d. Click Download, click Run, and then click Run again. e. When the utility launches, select the printer from the drop-down list, and then click Send Firmware. f. Follow the on-screen instructions to complete the installation, and then click the Exit button to close the utility. 4. Verify that the fax was set up when the printer software was installed. From the computer, in the HP program folder, run the Fax Setup Utility. 5. Verify that the telephone service supports analog fax. ● If using ISDN or digital PBX, contact your service provider for information about configuring to an analog fax line. ● If using a VoIP service, change the Fax Speed setting to Speed-Slow (9600 bps). From the control panel Home Screen, select Fax, select Setup, and then select Preferences. ● Ask if your service provider supports fax, and what the recommended fax modem speed is. Some companies might require an adapter. ● If you are using a DSL service, make sure that a filter is included on the phone-line connection to the printer. Contact the DSL service provider, or purchase a DSL filter if you do not have one. If a DSL filter is installed, try another filter because filters can be defective. 176 Chapter 9 Solve problems ENWW
-
 1
1 -
2
-
3
-
4
-
5
-
6
-
7
-
8
-
9
-
10
-
11
-
12
-
13
-
14
-
15
-
16
-
17
-
18
-
19
-
20
-
21
-
22
-
23
-
24
-
25
-
26
-
27
-
28
-
29
-
30
-
31
-
32
-
33
-
34
-
35
-
36
-
37
-
38
-
39
-
40
-
41
-
42
-
43
-
44
-
45
-
46
-
47
-
48
-
49
-
50
-
51
-
52
-
53
-
54
-
55
-
56
-
57
-
58
-
59
-
60
-
61
-
62
-
63
-
64
-
65
-
66
-
67
-
68
-
69
-
70
-
71
-
72
-
73
-
74
-
75
-
76
-
77
-
78
-
79
-
80
-
81
-
82
-
83
-
84
-
85
-
86
-
87
-
88
-
89
-
90
-
91
-
92
-
93
-
94
-
95
-
96
-
97
-
98
-
99
-
100
-
101
-
102
-
103
-
104
-
105
-
106
-
107
-
108
-
109
-
110
-
111
-
112
-
113
-
114
-
115
-
116
-
117
-
118
-
119
-
120
-
121
-
122
-
123
-
124
-
125
-
126
-
127
-
128
-
129
-
130
-
131
-
132
-
133
-
134
-
135
-
136
-
137
-
138
-
139
-
140
-
141
-
142
-
143
-
144
-
145
-
146
-
147
-
148
-
149
-
150
-
151
-
152
-
153
-
154
-
155
-
156
-
157
-
158
-
159
-
160
-
161
-
162
-
163
-
164
-
165
-
166
-
167
-
168
-
169
-
170
-
171
-
172
-
173
-
174
-
175
-
176
-
177
-
178
-
179
-
180
-
181
-
182
-
 183
183 -
 184
184 -
 185
185 -
 186
186 -
 187
187 -
 188
188 -
 189
189 -
 190
190 -
 191
191 -
 192
192 -
 193
193 -
194
 |
 |
