HP LaserJet Pro MFP M329 User Guide - Page 65
Disable or enable the job storage feature, Devices and Printers
 |
View all HP LaserJet Pro MFP M329 manuals
Add to My Manuals
Save this manual to your list of manuals |
Page 65 highlights
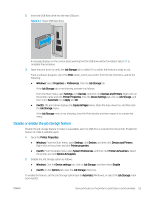
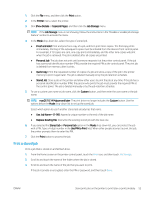
2. Insert the USB flash drive into the rear USB port. Figure 4-1 Insert USB flash drive A message displays on the control panel warning that the USB drive will be formatted. Select OK to complete the procedure. 3. Open the print driver to verify the Job Storage tab is visible. If it is visible, the feature is ready to use. From a software program, select the Print option, select your printer from the list of printers, and do the following: ● Windows: Select Properties or Preferences. Click the Job Storage tab. If the Job Storage tab is not showing, activate it as follows: From the Start menu, open Settings, click Devices, and then click Devices and Printers. Right-click on the printer name and click Printer Properties. Click the Device Settings tab, click on Job Storage, and then select Automatic. Click Apply and OK. ● macOS: The print driver displays the Copies & Pages menu. Open the drop-down list, and then click the Job Storage menu. If the Job Storage menu is not showing, close the Print window and then reopen it to activate the menu. Disable or enable the job storage feature Disable the job storage feature to make it unavailable, even if a USB drive is inserted into the printer. Enable the feature to make it available again. 1. Open the Printer Properties: ● Windows: From the Start menu, open Settings, click Devices, and then click Devices and Printers. Right-click on the printer and click Printer properties. ● macOS: From the Apple menu, open System Preferences, and then click Printers & Scanners. Select the printer and click Options & Supplies. 2. Disable the Job Storage option as follows: ● Windows: Click the Device settings tab, click on Job Storage, and then select Disable. ● macOS: On the Options tab, clear the Job Storage check box. To enable the feature, set the Job Storage option back to Automatic (Windows), or select the Job Storage check box (macOS). ENWW Store print jobs on the printer to print later or print privately 53
-
 1
1 -
2
-
3
-
4
-
5
-
6
-
7
-
8
-
9
-
10
-
11
-
12
-
13
-
14
-
15
-
16
-
17
-
18
-
19
-
20
-
21
-
22
-
23
-
24
-
25
-
26
-
27
-
28
-
29
-
30
-
31
-
32
-
33
-
34
-
35
-
36
-
37
-
38
-
39
-
40
-
41
-
42
-
43
-
44
-
45
-
46
-
47
-
48
-
49
-
50
-
51
-
52
-
53
-
54
-
55
-
56
-
57
-
58
-
59
-
 60
60 -
 61
61 -
 62
62 -
 63
63 -
 64
64 -
 65
65 -
 66
66 -
 67
67 -
 68
68 -
 69
69 -
 70
70 -
71
-
72
-
73
-
74
-
75
-
76
-
77
-
78
-
79
-
80
-
81
-
82
-
83
-
84
-
85
-
86
-
87
-
88
-
89
-
90
-
91
-
92
-
93
-
94
-
95
-
96
-
97
-
98
-
99
-
100
-
101
-
102
-
103
-
104
-
105
-
106
-
107
-
108
-
109
-
110
-
111
-
112
-
113
-
114
-
115
-
116
-
117
-
118
-
119
-
120
-
121
-
122
-
123
-
124
-
125
-
126
-
127
-
128
-
129
-
130
-
131
-
132
-
133
-
134
-
135
-
136
-
137
-
138
-
139
-
140
-
141
-
142
-
143
-
144
-
145
-
146
-
147
-
148
-
149
-
150
-
151
-
152
-
153
-
154
-
155
-
156
-
157
-
158
-
159
-
160
-
161
-
162
-
163
-
164
-
165
-
166
-
167
-
168
-
169
-
170
-
171
-
172
-
173
-
174
-
175
-
176
-
177
-
178
-
179
-
180
-
181
-
182
-
183
-
184
-
185
-
186
-
187
-
188
-
189
-
190
-
191
-
192
-
193
-
194
 |
 |
