HP LaserJet Pro P1606 HP LaserJet Professional P1560 and P1600 Series Printer - Page 132
Solve problems checklist
 |
View all HP LaserJet Pro P1606 manuals
Add to My Manuals
Save this manual to your list of manuals |
Page 132 highlights
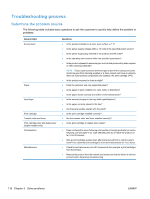
Solve problems checklist Table 3-1 Basic problem solving Problem Cause Solution When the product is connected to a correctly grounded power source, the LEDs on the control panel do not illuminate and the main motor does not rotate. No power to the product. The product does not turn on. 1. Verify that the power switch is turned on. 2. Verify that the power cable is correctly plugged into the outlet and the product. 3. Verify that the power outlet has the correct voltage. The formatter is defective. Replace the formatter. See Formatter PCA on page 67. The engine controller PCA is defective. Replace the engine controller PCA. See Engine controller PCA on page 97. When turned on, the LEDs on the control panel light up, but the main motor does not rotate. The product turns on, but the motor does not rotate. The print-cartridge door is open. A page is jammed in the paper path. The cable is not connected correctly. Close the print-cartridge door. Clear all paper from the paper path, and make sure that all sensors are working correctly. Reconnect the motor cable. The motor is not mounted correctly in the product chassis. Verify that the motor is connected correctly and that it rotates freely. The engine controller is defective. Replace the engine controller PCA. See Engine controller PCA on page 97. The main motor is defective. Replace the motor. See Main motor on page 87. The product turns on and the motor rotates, but none of the control-panel lights turn on and the control-panel buttons are unresponsive. The formatter is defective. Replace the formatter. See Formatter PCA on page 67 . The product is unresponsive. The product is on, but the control-panel lights indicate that the product is not in the "ready" state. The product has an internal error that was detected during the Power-On Self-Test sequence. Consult the list of controlpanel light patterns to identify and correct the error. The product is not "ready." 114 Chapter 3 Solve problems ENWW
-
 1
1 -
2
-
3
-
4
-
5
-
6
-
7
-
8
-
9
-
10
-
11
-
12
-
13
-
14
-
15
-
16
-
17
-
18
-
19
-
20
-
21
-
22
-
23
-
24
-
25
-
26
-
27
-
28
-
29
-
30
-
31
-
32
-
33
-
34
-
35
-
36
-
37
-
38
-
39
-
40
-
41
-
42
-
43
-
44
-
45
-
46
-
47
-
48
-
49
-
50
-
51
-
52
-
53
-
54
-
55
-
56
-
57
-
58
-
59
-
60
-
61
-
62
-
63
-
64
-
65
-
66
-
67
-
68
-
69
-
70
-
71
-
72
-
73
-
74
-
75
-
76
-
77
-
78
-
79
-
80
-
81
-
82
-
83
-
84
-
85
-
86
-
87
-
88
-
89
-
90
-
91
-
92
-
93
-
94
-
95
-
96
-
97
-
98
-
99
-
100
-
101
-
102
-
103
-
104
-
105
-
106
-
107
-
108
-
109
-
110
-
111
-
112
-
113
-
114
-
115
-
116
-
117
-
118
-
119
-
120
-
121
-
122
-
123
-
124
-
125
-
126
-
 127
127 -
 128
128 -
 129
129 -
 130
130 -
 131
131 -
 132
132 -
 133
133 -
 134
134 -
 135
135 -
 136
136 -
 137
137 -
138
-
139
-
140
-
141
-
142
-
143
-
144
-
145
-
146
-
147
-
148
-
149
-
150
-
151
-
152
-
153
-
154
-
155
-
156
-
157
-
158
-
159
-
160
-
161
-
162
-
163
-
164
-
165
-
166
-
167
-
168
-
169
-
170
-
171
-
172
-
173
-
174
-
175
-
176
-
177
-
178
-
179
-
180
-
181
-
182
-
183
-
184
-
185
-
186
-
187
-
188
-
189
-
190
-
191
-
192
-
193
-
194
-
195
-
196
-
197
-
198
-
199
-
200
-
201
-
202
-
203
-
204
-
205
-
206
-
207
-
208
-
209
-
210
-
211
-
212
-
213
-
214
-
215
-
216
-
217
-
218
-
219
-
220
-
221
-
222
-
223
-
224
-
225
-
226
 |
 |