HP LaserJet Pro P1606 HP LaserJet Professional P1560 and P1600 Series Printer - Page 160
Change jam recovery, Windows XP, Windows Server 2003
 |
View all HP LaserJet Pro P1606 manuals
Add to My Manuals
Save this manual to your list of manuals |
Page 160 highlights
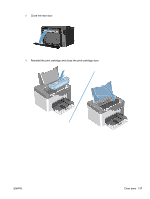
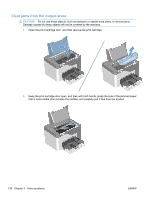
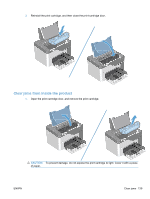
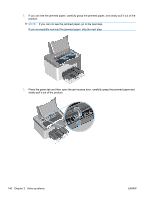
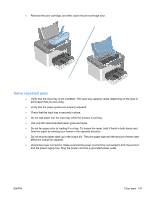
Change jam recovery When the Jam Recovery feature is turned on, the product reprints any pages that are damaged during a jam. 1. Use the printer driver to change the default settings. Follow the appropriate procedure, depending on the operating system you are using. Windows XP, Windows Server 2003, and Windows Server 2008 (using the default Start menu view) a. Click Start, and then click Printers and Faxes. b. Right-click the driver icon, and then select Properties. c. Click the Device Settings tab. Windows XP, Windows Server 2003, and Windows Server 2008 (using the Classic Start menu view) a. Click Start, click Settings, and then click Printers. b. Right-click the driver icon, and then select Properties. c. Click the Device Settings tab. Windows Vista and Windows 7 a. Click Start, click Control Panel, and then in the category for Hardware and Sound click Printer. b. Right-click the driver icon, and then select Properties. c. Click the Device Settings tab. Mac OS X 10.4 a. From the Apple menu , click the System Preferences menu and then click the Print & Fax icon. b. Click the Printer Setup button. Mac OS X 10.5 and 10.6 a. From the Apple menu , click the System Preferences menu and then click the Print & Fax icon. b. Select the product in the left side of the window. c. Click the Options & Supplies button. d. Click the Driver tab. 2. Click the Auto option or the Off option under Jam Recovery. 142 Chapter 3 Solve problems ENWW
-
 1
1 -
2
-
3
-
4
-
5
-
6
-
7
-
8
-
9
-
10
-
11
-
12
-
13
-
14
-
15
-
16
-
17
-
18
-
19
-
20
-
21
-
22
-
23
-
24
-
25
-
26
-
27
-
28
-
29
-
30
-
31
-
32
-
33
-
34
-
35
-
36
-
37
-
38
-
39
-
40
-
41
-
42
-
43
-
44
-
45
-
46
-
47
-
48
-
49
-
50
-
51
-
52
-
53
-
54
-
55
-
56
-
57
-
58
-
59
-
60
-
61
-
62
-
63
-
64
-
65
-
66
-
67
-
68
-
69
-
70
-
71
-
72
-
73
-
74
-
75
-
76
-
77
-
78
-
79
-
80
-
81
-
82
-
83
-
84
-
85
-
86
-
87
-
88
-
89
-
90
-
91
-
92
-
93
-
94
-
95
-
96
-
97
-
98
-
99
-
100
-
101
-
102
-
103
-
104
-
105
-
106
-
107
-
108
-
109
-
110
-
111
-
112
-
113
-
114
-
115
-
116
-
117
-
118
-
119
-
120
-
121
-
122
-
123
-
124
-
125
-
126
-
127
-
128
-
129
-
130
-
131
-
132
-
133
-
134
-
135
-
136
-
137
-
138
-
139
-
140
-
141
-
142
-
143
-
144
-
145
-
146
-
147
-
148
-
149
-
150
-
151
-
152
-
153
-
154
-
 155
155 -
 156
156 -
 157
157 -
 158
158 -
 159
159 -
 160
160 -
 161
161 -
 162
162 -
 163
163 -
 164
164 -
 165
165 -
166
-
167
-
168
-
169
-
170
-
171
-
172
-
173
-
174
-
175
-
176
-
177
-
178
-
179
-
180
-
181
-
182
-
183
-
184
-
185
-
186
-
187
-
188
-
189
-
190
-
191
-
192
-
193
-
194
-
195
-
196
-
197
-
198
-
199
-
200
-
201
-
202
-
203
-
204
-
205
-
206
-
207
-
208
-
209
-
210
-
211
-
212
-
213
-
214
-
215
-
216
-
217
-
218
-
219
-
220
-
221
-
222
-
223
-
224
-
225
-
226
 |
 |
