HP LaserJet Pro P1606 HP LaserJet Professional P1560 and P1600 Series Printer - Page 148
Control-panel lights continued - manual
 |
View all HP LaserJet Pro P1606 manuals
Add to My Manuals
Save this manual to your list of manuals |
Page 148 highlights
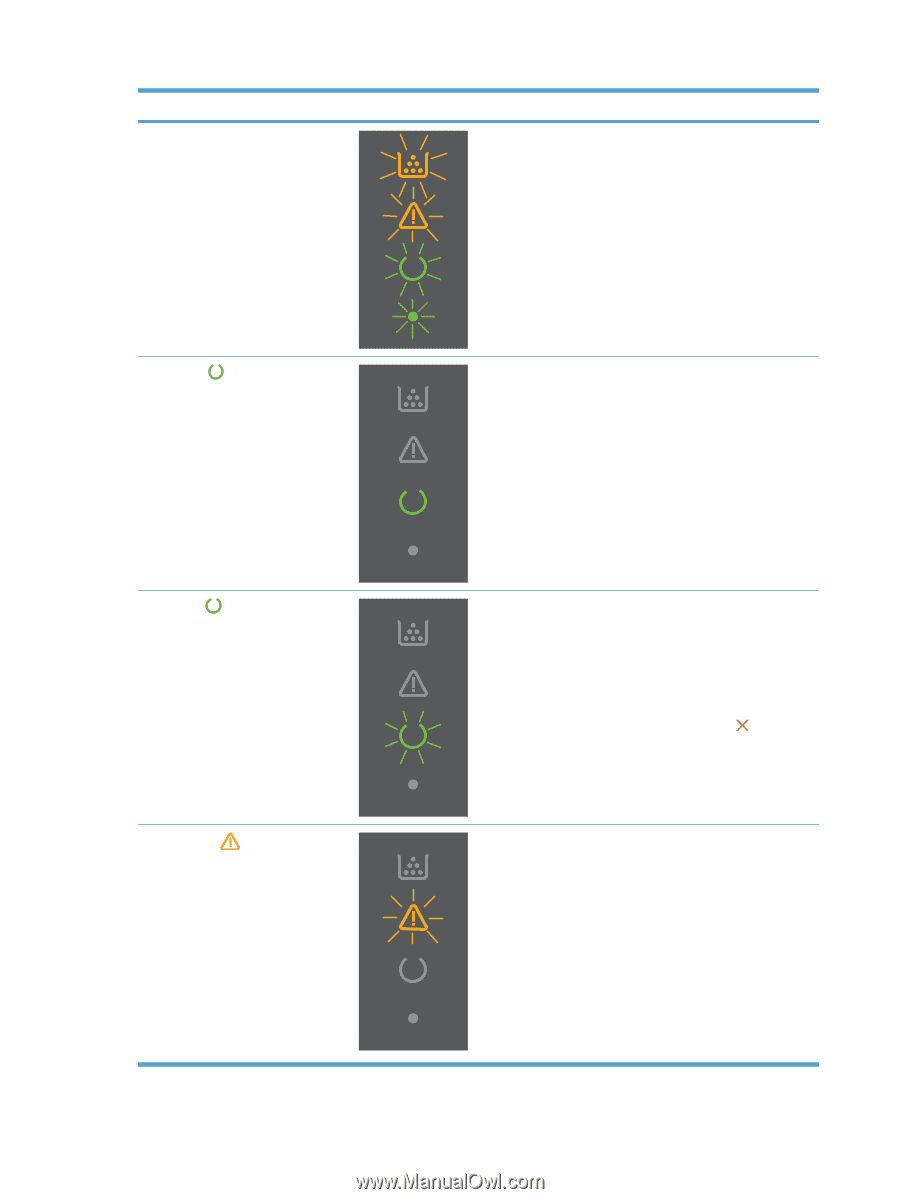
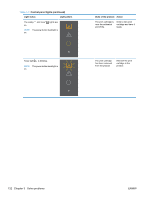
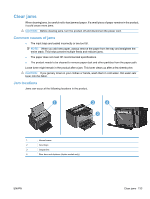
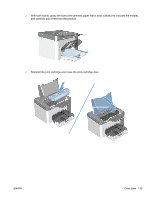
Table 3-3 Control-panel lights (continued) Light status Light pattern All lights cycle. NOTE: The power button backlight is on. Ready light is on, and all other lights are off. NOTE: The power button backlight is on. State of the product Action The product is processing a cleaning page. No action required. Wait for the cleaning process to end. The product enters the Ready state when the cleaning process is finished. The product is in the Ready state. No action required. The product is ready to receive a print job. Ready light is blinking, and all other lights are off. NOTE: The power button backlight is on. Attention light is blinking, and all other lights are off. NOTE: The power button backlight is on. 130 Chapter 3 Solve problems The product is receiving or processing data. No action required. The product is receiving or processing a print job. To cancel the current job, press the cancel button . The product has experienced an error that can be corrected at the product, such as a jam, an open door, or the absence of paper in the proper tray. Inspect the product, determine the error, and then correct the error. If the error is the absence of paper in the proper tray or the product is in a manual feed mode, put the proper paper in the tray and follow the on-screen instructions, or open and close the printcartridge door to resume printing. ENWW
-
 1
1 -
2
-
3
-
4
-
5
-
6
-
7
-
8
-
9
-
10
-
11
-
12
-
13
-
14
-
15
-
16
-
17
-
18
-
19
-
20
-
21
-
22
-
23
-
24
-
25
-
26
-
27
-
28
-
29
-
30
-
31
-
32
-
33
-
34
-
35
-
36
-
37
-
38
-
39
-
40
-
41
-
42
-
43
-
44
-
45
-
46
-
47
-
48
-
49
-
50
-
51
-
52
-
53
-
54
-
55
-
56
-
57
-
58
-
59
-
60
-
61
-
62
-
63
-
64
-
65
-
66
-
67
-
68
-
69
-
70
-
71
-
72
-
73
-
74
-
75
-
76
-
77
-
78
-
79
-
80
-
81
-
82
-
83
-
84
-
85
-
86
-
87
-
88
-
89
-
90
-
91
-
92
-
93
-
94
-
95
-
96
-
97
-
98
-
99
-
100
-
101
-
102
-
103
-
104
-
105
-
106
-
107
-
108
-
109
-
110
-
111
-
112
-
113
-
114
-
115
-
116
-
117
-
118
-
119
-
120
-
121
-
122
-
123
-
124
-
125
-
126
-
127
-
128
-
129
-
130
-
131
-
132
-
133
-
134
-
135
-
136
-
137
-
138
-
139
-
140
-
141
-
142
-
 143
143 -
 144
144 -
 145
145 -
 146
146 -
 147
147 -
 148
148 -
 149
149 -
 150
150 -
 151
151 -
 152
152 -
 153
153 -
154
-
155
-
156
-
157
-
158
-
159
-
160
-
161
-
162
-
163
-
164
-
165
-
166
-
167
-
168
-
169
-
170
-
171
-
172
-
173
-
174
-
175
-
176
-
177
-
178
-
179
-
180
-
181
-
182
-
183
-
184
-
185
-
186
-
187
-
188
-
189
-
190
-
191
-
192
-
193
-
194
-
195
-
196
-
197
-
198
-
199
-
200
-
201
-
202
-
203
-
204
-
205
-
206
-
207
-
208
-
209
-
210
-
211
-
212
-
213
-
214
-
215
-
216
-
217
-
218
-
219
-
220
-
221
-
222
-
223
-
224
-
225
-
226
 |
 |