HP LaserJet Pro P1606 HP LaserJet Professional P1560 and P1600 Series Printer - Page 133
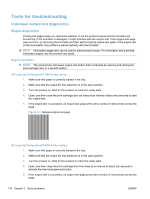
Problem, Cause, Solution, Perform an engine test to, verify print-engine, components., Demo
 |
View all HP LaserJet Pro P1606 manuals
Add to My Manuals
Save this manual to your list of manuals |
Page 133 highlights
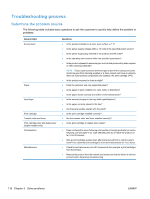
Table 3-1 Basic problem solving (continued) Problem Cause Solution The product turns on, the motor rotates, and the control panel indicates the "ready" state, but the product does not print. A component is defective. The product does not print. Perform an engine test to verify print-engine components. 1. Print an engine test page. See Engine-test button on page 118. 2. If the engine test page does not print, check all the connectors on the engine controller PCA, and reconnect any cables that are connected incorrectly. 3. If, after checking the connectors, the error persists, replace the engine controller PCA. See Engine controller PCA on page 97. The formatter is defective. Print a demo page. Select Demo Page from the Print Information Pages dropdown on the Services tab in the printer driver. If the Demo page does not print, replace the formatter. See Formatter PCA on page 67. The product prints the engine test or a configuration page, but does not print jobs from a computer. The product does not print from a computer. The cable is not connected correctly. An incorrect driver is selected. Reconnect the cable. Try using a new USB cable that is 3 m (10 ft) or less in length. Select the correct printer driver. The printer driver is not installed correctly. Remove and then reinstall the product software. Make sure that you use the correct procedure and port setting. Other devices are connected to the product (for example, through a switch or hub) that are interfering with the computer-product communications. Disconnect the other devices, switches, or hubs. There is a computer-port communications problem. Reset the computer port settings (see the computer user guide for more information). The formatter is defective. Replace the formatter. See Formatter PCA on page 67 . ENWW Solve problems checklist 115
-
 1
1 -
2
-
3
-
4
-
5
-
6
-
7
-
8
-
9
-
10
-
11
-
12
-
13
-
14
-
15
-
16
-
17
-
18
-
19
-
20
-
21
-
22
-
23
-
24
-
25
-
26
-
27
-
28
-
29
-
30
-
31
-
32
-
33
-
34
-
35
-
36
-
37
-
38
-
39
-
40
-
41
-
42
-
43
-
44
-
45
-
46
-
47
-
48
-
49
-
50
-
51
-
52
-
53
-
54
-
55
-
56
-
57
-
58
-
59
-
60
-
61
-
62
-
63
-
64
-
65
-
66
-
67
-
68
-
69
-
70
-
71
-
72
-
73
-
74
-
75
-
76
-
77
-
78
-
79
-
80
-
81
-
82
-
83
-
84
-
85
-
86
-
87
-
88
-
89
-
90
-
91
-
92
-
93
-
94
-
95
-
96
-
97
-
98
-
99
-
100
-
101
-
102
-
103
-
104
-
105
-
106
-
107
-
108
-
109
-
110
-
111
-
112
-
113
-
114
-
115
-
116
-
117
-
118
-
119
-
120
-
121
-
122
-
123
-
124
-
125
-
126
-
127
-
 128
128 -
 129
129 -
 130
130 -
 131
131 -
 132
132 -
 133
133 -
 134
134 -
 135
135 -
 136
136 -
 137
137 -
 138
138 -
139
-
140
-
141
-
142
-
143
-
144
-
145
-
146
-
147
-
148
-
149
-
150
-
151
-
152
-
153
-
154
-
155
-
156
-
157
-
158
-
159
-
160
-
161
-
162
-
163
-
164
-
165
-
166
-
167
-
168
-
169
-
170
-
171
-
172
-
173
-
174
-
175
-
176
-
177
-
178
-
179
-
180
-
181
-
182
-
183
-
184
-
185
-
186
-
187
-
188
-
189
-
190
-
191
-
192
-
193
-
194
-
195
-
196
-
197
-
198
-
199
-
200
-
201
-
202
-
203
-
204
-
205
-
206
-
207
-
208
-
209
-
210
-
211
-
212
-
213
-
214
-
215
-
216
-
217
-
218
-
219
-
220
-
221
-
222
-
223
-
224
-
225
-
226
 |
 |
