HP LaserJet Pro P1606 HP LaserJet Professional P1560 and P1600 Series Printer - Page 136
Tools for troubleshooting, Individual component diagnostics, Engine diagnostics, Engine-test button - printer series
 |
View all HP LaserJet Pro P1606 manuals
Add to My Manuals
Save this manual to your list of manuals |
Page 136 highlights
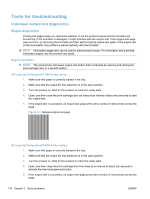
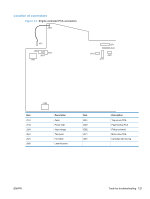
Tools for troubleshooting Individual component diagnostics Engine diagnostics Printing test pages helps you determine whether or not the product engine and the formatter are functioning. If the formatter is damaged, it might interfere with the engine test. If the engine-test page does not print, try removing the formatter and then performing the engine test again. If the engine test is then successful, the problem is almost certainly with the formatter. NOTE: Information pages also can be used to solve product issues. For information about printing information pages, see the product user guide. Engine-test button NOTE: The product has a firmware engine-test button that is activated by opening and closing the print-cartridge door in a specific pattern. HP LaserJet Professional P1560 Printer series 1. Make sure that paper is correctly loaded in the tray. 2. Make sure that the output bin tray extension is in the open position. 3. Turn the product on. Wait for the product to reach the ready state. 4. Open, and then close the print-cartridge door six times at an interval of about two seconds to start the engine-test. 5. If the engine test is successful, an engine-test page prints with a series of vertical lines across the page. Figure 3-1 Sample engine test page HP LaserJet Professional P1600 Printer series 1. Make sure that paper is correctly loaded in the tray. 2. Make sure that the output bin tray extension is in the open position. 3. Turn the product on. Wait for the product to reach the ready state. 4. Open, and then close the print-cartridge door five times at an interval of about two seconds to activate the internal engine-test button. 5. If the engine test is successful, an engine-test page prints with a series of vertical lines across the page. 118 Chapter 3 Solve problems ENWW
-
 1
1 -
2
-
3
-
4
-
5
-
6
-
7
-
8
-
9
-
10
-
11
-
12
-
13
-
14
-
15
-
16
-
17
-
18
-
19
-
20
-
21
-
22
-
23
-
24
-
25
-
26
-
27
-
28
-
29
-
30
-
31
-
32
-
33
-
34
-
35
-
36
-
37
-
38
-
39
-
40
-
41
-
42
-
43
-
44
-
45
-
46
-
47
-
48
-
49
-
50
-
51
-
52
-
53
-
54
-
55
-
56
-
57
-
58
-
59
-
60
-
61
-
62
-
63
-
64
-
65
-
66
-
67
-
68
-
69
-
70
-
71
-
72
-
73
-
74
-
75
-
76
-
77
-
78
-
79
-
80
-
81
-
82
-
83
-
84
-
85
-
86
-
87
-
88
-
89
-
90
-
91
-
92
-
93
-
94
-
95
-
96
-
97
-
98
-
99
-
100
-
101
-
102
-
103
-
104
-
105
-
106
-
107
-
108
-
109
-
110
-
111
-
112
-
113
-
114
-
115
-
116
-
117
-
118
-
119
-
120
-
121
-
122
-
123
-
124
-
125
-
126
-
127
-
128
-
129
-
130
-
 131
131 -
 132
132 -
 133
133 -
 134
134 -
 135
135 -
 136
136 -
 137
137 -
 138
138 -
 139
139 -
 140
140 -
 141
141 -
142
-
143
-
144
-
145
-
146
-
147
-
148
-
149
-
150
-
151
-
152
-
153
-
154
-
155
-
156
-
157
-
158
-
159
-
160
-
161
-
162
-
163
-
164
-
165
-
166
-
167
-
168
-
169
-
170
-
171
-
172
-
173
-
174
-
175
-
176
-
177
-
178
-
179
-
180
-
181
-
182
-
183
-
184
-
185
-
186
-
187
-
188
-
189
-
190
-
191
-
192
-
193
-
194
-
195
-
196
-
197
-
198
-
199
-
200
-
201
-
202
-
203
-
204
-
205
-
206
-
207
-
208
-
209
-
210
-
211
-
212
-
213
-
214
-
215
-
216
-
217
-
218
-
219
-
220
-
221
-
222
-
223
-
224
-
225
-
226
 |
 |