HP P6300 HP P6300/P6500 EVA Installation Guide (5697-2485, September 2013) - Page 22
Attach the brackets for a longer chassis, Typical rack configurations
 |
View all HP P6300 manuals
Add to My Manuals
Save this manual to your list of manuals |
Page 22 highlights
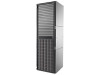
NOTE: The power distribution units can be assembled either vertically (using the PDU hinge) as shown for configuring for expansion, or horizontally as shown for configuring for maximum rack space. Figure 6 Typical rack configurations P63x0 configured for maximum rack space P65x0 configured for expansion Attach the brackets for a longer chassis If you are installing a longer chassis into your cabinet, such as for the controller enclosure, you must remove the shipping retaining bracket and install the smaller brackets supplied in the accessory kit. NOTE: A No. 2 Phillips head screwdriver is required for this procedure. 1. Remove the existing screw and shipping retaining bracket from the rear of the rail. 2. Insert a screw through the bottom hole of the new bracket and loosely secure the bracket to the rear of the rail. 22 Installing components
-
 1
1 -
2
-
3
-
4
-
5
-
6
-
7
-
8
-
9
-
10
-
11
-
12
-
13
-
14
-
15
-
16
-
 17
17 -
 18
18 -
 19
19 -
 20
20 -
 21
21 -
 22
22 -
 23
23 -
 24
24 -
 25
25 -
 26
26 -
 27
27 -
28
-
29
-
30
-
31
-
32
-
33
-
34
-
35
-
36
-
37
-
38
-
39
-
40
-
41
-
42
-
43
-
44
-
45
-
46
-
47
-
48
-
49
-
50
-
51
-
52
-
53
-
54
-
55
-
56
-
57
-
58
-
59
-
60
-
61
-
62
-
63
-
64
-
65
-
66
-
67
-
68
-
69
-
70
-
71
-
72
-
73
-
74
-
75
-
76
-
77
-
78
-
79
-
80
-
81
-
82
 |
 |
