HP P6300 HP P6300/P6500 EVA Installation Guide (5697-2485, September 2013) - Page 26
At the rear of the rack, loosen the screw on the shipping retainingbracket 1
 |
View all HP P6300 manuals
Add to My Manuals
Save this manual to your list of manuals |
Page 26 highlights
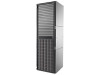
1. Align the enclosure with the rails and slide it into the rack (Figure 13 (page 26)). Figure 13 Installing an enclosure (view from front of rack) 2. Continue sliding the enclosure into the rack until the front edge is flush with the front of the rack (1, Figure 14 (page 26)). Tighten the enclosure screws into the rack (2) taking care not to strip the screws. Figure 14 Securing the rear of the enclosure in the rack (view from front of rack) 3. At the rear of the rack, loosen the screw on the shipping retaining bracket (1, Figure 15 (page 27)) and slide the bracket forward (2) until the tab engages the slot in the chassis. Tighten the screw on the bracket. 26 Installing components
-
 1
1 -
2
-
3
-
4
-
5
-
6
-
7
-
8
-
9
-
10
-
11
-
12
-
13
-
14
-
15
-
16
-
17
-
18
-
19
-
20
-
 21
21 -
 22
22 -
 23
23 -
 24
24 -
 25
25 -
 26
26 -
 27
27 -
 28
28 -
 29
29 -
 30
30 -
 31
31 -
32
-
33
-
34
-
35
-
36
-
37
-
38
-
39
-
40
-
41
-
42
-
43
-
44
-
45
-
46
-
47
-
48
-
49
-
50
-
51
-
52
-
53
-
54
-
55
-
56
-
57
-
58
-
59
-
60
-
61
-
62
-
63
-
64
-
65
-
66
-
67
-
68
-
69
-
70
-
71
-
72
-
73
-
74
-
75
-
76
-
77
-
78
-
79
-
80
-
81
-
82
 |
 |

1.
Align the enclosure with the rails and slide it into the rack (
Figure 13 (page 26)
).
Figure 13 Installing an enclosure (view from front of rack)
2.
Continue sliding the enclosure into the rack until the front edge is flush with the front of the
rack (1,
Figure 14 (page 26)
). Tighten the enclosure screws into the rack (2) taking care not
to strip the screws.
Figure 14 Securing the rear of the enclosure in the rack (view from front of rack)
3.
At the rear of the rack, loosen the screw on the shipping retainingbracket (1,
Figure 15 (page
27)
) and slide the bracket forward (2) until the tab engages the slot in the chassis. Tighten the
screw on the bracket.
26
Installing components