HP Photosmart 850 HP Photosmart 850 digital camera - (English) User Guide - Page 19
Macintosh, Camera states and menus - software
 |
View all HP Photosmart 850 manuals
Add to My Manuals
Save this manual to your list of manuals |
Page 19 highlights
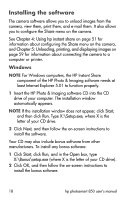
Macintosh 1 Insert the HP Photo & Imaging software CD into the CD drive of your computer. 2 Double-click the CD icon on the computer desktop. 3 Double-click the installer icon, and then follow the on-screen instructions to install the software. Your CD may also include bonus software from other manufacturers. To install any bonus software: 1 Double-click the Bonus folder icon. 2 Double-click the installer icon for the bonus software. 3 Follow the on-screen instructions to install the software. Camera states and menus Your camera has three main states that allow you to complete certain tasks. Each of these states has an associated menu you can use to adjust camera settings or perform tasks in that state. z Capture-Allows you to take still pictures and record video clips. For information on using Capture, see Chapter 2: Taking pictures and recording video clips on page 21. z Playback-Allows you to review the still images and video clips that you capture. For information on using Playback, see Chapter 3: Reviewing images and video clips on page 43. z Share-Allows you to use the HP Instant Share technology to select images in the camera that will be automatically processed later when the camera is connected to your computer or to a USB-enabled HP printer. For information on using Share, see Chapter 4: Using hp instant share on page 51. Chapter 1: Getting started 19
-
 1
1 -
2
-
3
-
4
-
5
-
6
-
7
-
8
-
9
-
10
-
11
-
12
-
13
-
 14
14 -
 15
15 -
 16
16 -
 17
17 -
 18
18 -
 19
19 -
 20
20 -
 21
21 -
 22
22 -
 23
23 -
 24
24 -
25
-
26
-
27
-
28
-
29
-
30
-
31
-
32
-
33
-
34
-
35
-
36
-
37
-
38
-
39
-
40
-
41
-
42
-
43
-
44
-
45
-
46
-
47
-
48
-
49
-
50
-
51
-
52
-
53
-
54
-
55
-
56
-
57
-
58
-
59
-
60
-
61
-
62
-
63
-
64
-
65
-
66
-
67
-
68
-
69
-
70
-
71
-
72
-
73
-
74
-
75
-
76
-
77
-
78
-
79
-
80
-
81
-
82
-
83
-
84
-
85
-
86
-
87
-
88
-
89
-
90
-
91
-
92
-
93
-
94
-
95
-
96
-
97
-
98
-
99
-
100
-
101
-
102
-
103
-
104
-
105
-
106
-
107
-
108
-
109
-
110
-
111
-
112
 |
 |
