HP Photosmart 8700 User's Guide - Page 16
Paper type, How to load, Tray to load, Main tray, Front feed slot, supported
 |
View all HP Photosmart 8700 manuals
Add to My Manuals
Save this manual to your list of manuals |
Page 16 highlights
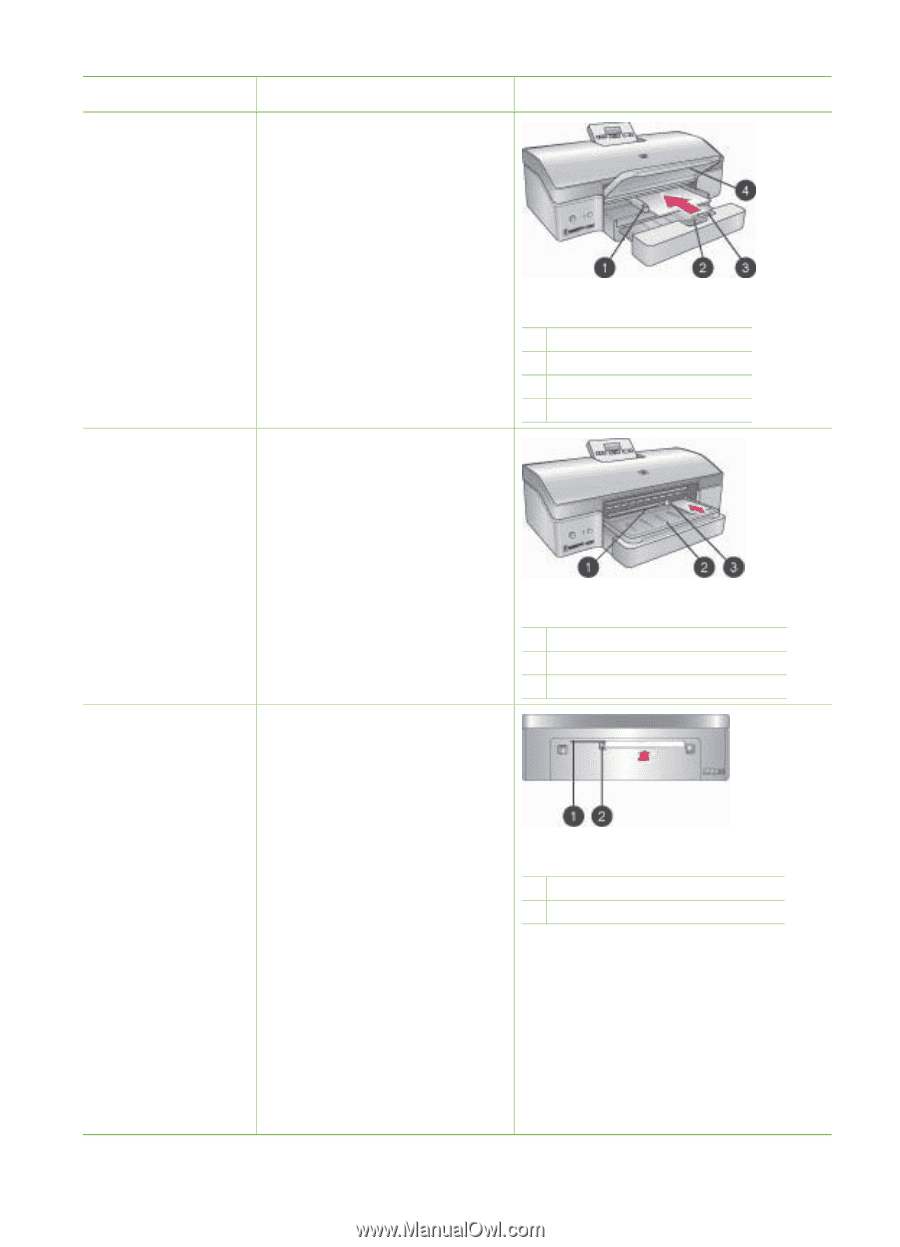
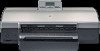
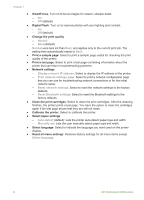
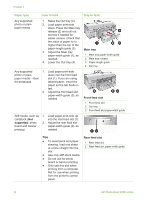
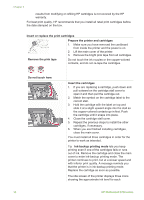
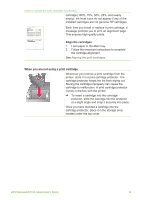
Chapter 2 Paper type How to load Tray to load Any supported photo or plain paper media 1. Raise the Out tray (4). 2. Load paper print-side down. Press the Main tray release (2) and pull out the tray if needed for easier access. Check that the stack of paper is no higher than the top of the paper-length guide (3). 3. Adjust the Main tray paper-width guide (1), as needed. Main tray 1 Main tray paper-width guide 2 Main tray release 4. Lower the Out tray (4). 3 Paper-length guide 4 Out tray Any supported photo or plain paper media-ideal for envelopes 1. Load paper print-side down into the front feed slot (1). If you are using tabbed paper, insert the paper so the tab feeds in last. 2. Adjust the front feed slot paper-width guide (3), as needed. Front feed slot 1 Front feed slot 2 Out tray 3 Front feed slot paper-width guide Stiff media, such as 1. Load paper print-side up cardstock (Not into the rear feed slot (1). supported: photo 2. Adjust the rear feed slot board and banner paper-width guide (2), as printing) needed. Tips ● To avoid jams and paper skewing, load one sheet at a time straight into the slot ● Use only stiff stock media ● Do not use for photo board or banner printing ● Only use this slot when printing from a computer. Not for use when printing from the printer's control panel. Rear feed slot 1 Rear feed slot 2 Rear feed slot paper-width guide 12 HP Photosmart 8700 series
-
 1
1 -
2
-
3
-
4
-
5
-
6
-
7
-
8
-
9
-
10
-
 11
11 -
 12
12 -
 13
13 -
 14
14 -
 15
15 -
 16
16 -
 17
17 -
 18
18 -
 19
19 -
 20
20 -
 21
21 -
22
-
23
-
24
-
25
-
26
-
27
-
28
-
29
-
30
-
31
-
32
-
33
-
34
-
35
-
36
-
37
-
38
-
39
-
40
-
41
-
42
-
43
-
44
-
45
-
46
-
47
-
48
-
49
-
50
-
51
-
52
-
53
-
54
-
55
-
56
-
57
-
58
-
59
-
60
-
61
-
62
-
63
-
64
-
65
-
66
-
67
-
68
-
69
-
70
-
71
-
72
-
73
-
74
-
75
-
76
-
77
-
78
-
79
-
80
-
81
-
82
-
83
 |
 |