HP Photosmart A620 User Guide - Page 12
The touch screen and stylus, Use the touch screen, Quick touch frame
 |
View all HP Photosmart A620 manuals
Add to My Manuals
Save this manual to your list of manuals |
Page 12 highlights
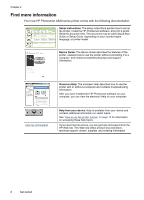
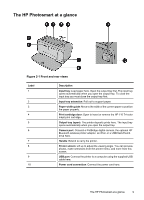
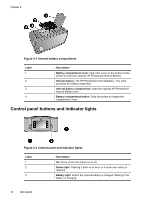
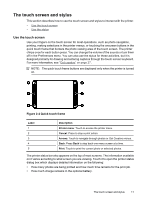
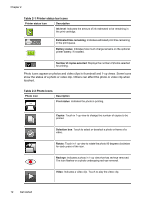
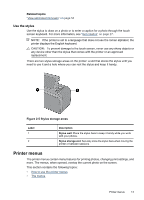
The touch screen and stylus This section describes how to use the touch screen and stylus to interact with the printer. • Use the touch screen • Use the stylus Use the touch screen Use your fingers on the touch screen for most operations, such as photo navigation, printing, making selections in the printer menus, or touching the onscreen buttons in the quick touch frame that borders the photo viewing area of the touch screen. The printer chirps once for each button press. You can change the volume of the sounds or turn them off in the Preferences menu. You can also use the stylus for these activities, but it is designed primarily for drawing and entering captions through the touch screen keyboard. For more information, see "Get creative" on page 27. NOTE: The quick touch frame buttons are displayed only when the printer is turned on. Figure 2-4 Quick touch frame Label 1 2 3 4 5 Description Printer menu: Touch to access the printer menu. Cancel: Press to stop a print action. Arrows: Touch to navigate through photos or Get Creative menus. Back: Press Back to step back one menu screen at a time. Print: Touch to print the current photo or selected photos. The printer status bar also appears on the top of most screens. The information available on it varies according to what screen you are viewing. Touch it to open the printer status dialog box which displays detailed information on the following: • How many photos are being printed and how much time remains for the print job. • How much charge remains in the optional battery. The touch screen and stylus 11
-
 1
1 -
2
-
3
-
4
-
5
-
6
-
 7
7 -
 8
8 -
 9
9 -
 10
10 -
 11
11 -
 12
12 -
 13
13 -
 14
14 -
 15
15 -
 16
16 -
 17
17 -
18
-
19
-
20
-
21
-
22
-
23
-
24
-
25
-
26
-
27
-
28
-
29
-
30
-
31
-
32
-
33
-
34
-
35
-
36
-
37
-
38
-
39
-
40
-
41
-
42
-
43
-
44
-
45
-
46
-
47
-
48
-
49
-
50
-
51
-
52
-
53
-
54
-
55
-
56
-
57
-
58
-
59
-
60
-
61
-
62
-
63
-
64
-
65
-
66
-
67
-
68
-
69
-
70
-
71
-
72
-
73
-
74
-
75
-
76
-
77
-
78
-
79
-
80
-
81
-
82
-
83
-
84
-
85
-
86
-
87
-
88
 |
 |