HP Photosmart A620 User Guide - Page 31
Add clip art, Add Frame
 |
View all HP Photosmart A620 manuals
Add to My Manuals
Save this manual to your list of manuals |
Page 31 highlights
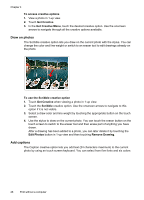
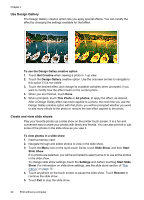
Chapter 4 To use the Frames creative option 1. Touch Get Creative when viewing a photo in 1-up view. 2. Touch the Frames creative option. Use the onscreen arrows to navigate to this option if it is not visible. 3. Touch the desired category to view the frames available in that category. Touch to return to the main Frames window to select a different category. 4. Touch the desired frame. 5. Adjust the photo by using the Zoom buttons. You can move the photo around within the frame with your finger or rotate it by touching the Rotate button. 6. When you are finished, touch Done. 7. In the Add Frame To dialog box, touch This Photo or All photos, as desired. After a frame has been added to a photo, you can later delete it by touching the Edit Photos button in 1-up view and then touching Remove Frame. Follow the prompts on the touch screen. Add clip art The Clip Art creative option lets you add clip art to the current photo. You can select from several categories, including: Seasonal, Kids, General, and Special. To use the Clip Art creative option 1. Touch Get Creative when viewing a photo in 1-up view. 2. Touch the Clip Art creative option. Use the onscreen arrows to navigate to this option if it is not visible. 3. Touch the desired category to view the clip art available in that category. Touch to return to the main Clip Art window to select a different category. 4. Touch the desired clip art. 5. Adjust the clip art using the appropriate onscreen buttons to make it larger or smaller or to rotate it. Move it around on the photo by dragging it with your finger or the stylus. 6. When you are finished, touch Done. After clip art has been added to a photo, the next time you use the Clip Art creative option with that photo, you will be prompted whether you want to add more clip art to the photo or remove clip art currently on the photo. 30 Print without a computer
-
 1
1 -
2
-
3
-
4
-
5
-
6
-
7
-
8
-
9
-
10
-
11
-
12
-
13
-
14
-
15
-
16
-
17
-
18
-
19
-
20
-
21
-
22
-
23
-
24
-
25
-
 26
26 -
 27
27 -
 28
28 -
 29
29 -
 30
30 -
 31
31 -
 32
32 -
 33
33 -
 34
34 -
 35
35 -
 36
36 -
37
-
38
-
39
-
40
-
41
-
42
-
43
-
44
-
45
-
46
-
47
-
48
-
49
-
50
-
51
-
52
-
53
-
54
-
55
-
56
-
57
-
58
-
59
-
60
-
61
-
62
-
63
-
64
-
65
-
66
-
67
-
68
-
69
-
70
-
71
-
72
-
73
-
74
-
75
-
76
-
77
-
78
-
79
-
80
-
81
-
82
-
83
-
84
-
85
-
86
-
87
-
88
 |
 |