HP Pro 6305 Maintenance and Service Guide HP Compaq Pro 6305 Microtower Busine - Page 95
Speaker, Rotate the top of the speaker downward
 |
View all HP Pro 6305 manuals
Add to My Manuals
Save this manual to your list of manuals |
Page 95 highlights
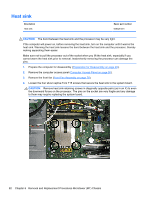
Speaker Description Speaker Spare part number 645330-001 1. Prepare the computer for disassembly (Preparation for Disassembly on page 49). 2. Remove the access panel (Computer Access Panel on page 50). 3. Remove the front fan assembly (Front Fan Assembly on page 78). 4. Disconnect the speaker wire from the system board connector labeled SPKR. 5. From the inside of the chassis, remove the two silver Torx T15 screws (1) that secure the speaker to the chassis. 6. Rotate the top of the speaker downward (2), and then remove it from the chassis. Figure 6-41 Removing the speaker To replace the speaker, reverse the removal procedures. Speaker 85
-
 1
1 -
2
-
3
-
4
-
5
-
6
-
7
-
8
-
9
-
10
-
11
-
12
-
13
-
14
-
15
-
16
-
17
-
18
-
19
-
20
-
21
-
22
-
23
-
24
-
25
-
26
-
27
-
28
-
29
-
30
-
31
-
32
-
33
-
34
-
35
-
36
-
37
-
38
-
39
-
40
-
41
-
42
-
43
-
44
-
45
-
46
-
47
-
48
-
49
-
50
-
51
-
52
-
53
-
54
-
55
-
56
-
57
-
58
-
59
-
60
-
61
-
62
-
63
-
64
-
65
-
66
-
67
-
68
-
69
-
70
-
71
-
72
-
73
-
74
-
75
-
76
-
77
-
78
-
79
-
80
-
81
-
82
-
83
-
84
-
85
-
86
-
87
-
88
-
89
-
 90
90 -
 91
91 -
 92
92 -
 93
93 -
 94
94 -
 95
95 -
 96
96 -
 97
97 -
 98
98 -
 99
99 -
 100
100 -
101
-
102
-
103
-
104
-
105
-
106
-
107
-
108
-
109
-
110
-
111
-
112
-
113
-
114
-
115
-
116
-
117
-
118
-
119
-
120
-
121
-
122
-
123
-
124
-
125
-
126
-
127
-
128
-
129
-
130
-
131
-
132
-
133
-
134
-
135
-
136
-
137
-
138
-
139
-
140
-
141
-
142
-
143
-
144
-
145
-
146
-
147
-
148
-
149
-
150
-
151
-
152
-
153
-
154
-
155
-
156
-
157
-
158
-
159
-
160
-
161
-
162
-
163
-
164
-
165
-
166
-
167
-
168
-
169
-
170
-
171
-
172
-
173
-
174
-
175
-
176
-
177
-
178
-
179
-
180
-
181
-
182
-
183
-
184
-
185
-
186
-
187
-
188
-
189
-
190
-
191
-
192
-
193
-
194
-
195
-
196
-
197
-
198
-
199
-
200
-
201
-
202
-
203
-
204
-
205
-
206
-
207
-
208
-
209
-
210
-
211
-
212
-
213
-
214
-
215
-
216
-
217
 |
 |

Speaker
Description
Spare part number
Speaker
645330-001
1.
Prepare the computer for disassembly (
Preparation for Disassembly
on page
49
).
2.
Remove the access panel (
Computer Access Panel
on page
50
).
3.
Remove the front fan assembly (
Front Fan Assembly
on page
78
).
4.
Disconnect the speaker wire from the system board connector labeled SPKR.
5.
From the inside of the chassis, remove the two silver Torx T15 screws
(1)
that secure the
speaker to the chassis.
6.
Rotate the top of the speaker downward
(2)
, and then remove it from the chassis.
Figure 6-41
Removing the speaker
To replace the speaker, reverse the removal procedures.
Speaker
85