HP ProLiant 2500 Compaq ProLiant 2500 Servers Installation Guide - Page 75
Inserting Cage Nuts in the Rack Frame, of the rails at
 |
View all HP ProLiant 2500 manuals
Add to My Manuals
Save this manual to your list of manuals |
Page 75 highlights
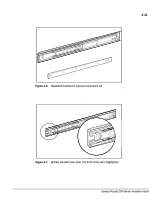
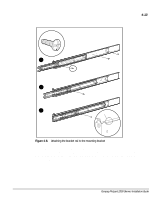
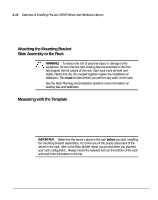
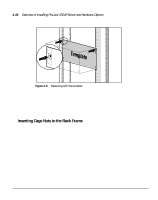
CZR4-009.EPS 4-16 Overview of Installing ProLiant 2500R Server and Hardware Options Figure 4-9. Measuring with the template 3. After marking the front of the rack, flip the template over and mark the back rails of the rack. Open the rear door of the rack to access the back rails. 4. On the back of the rack, also mark the rail to show the top of the template. This will help you align a template for the next component. Inserting Cage Nuts in the Rack Frame After marking the positions for the fasteners in both the front and back of the rack, use the fitting tool to insert cage nuts on the inside of the rails at the marked locations. The cage nuts and fitting tool are included in the hardware kit supplied with the rack. 1. Position the cage nut as shown in the following figure, on the inside of the rail. 2. Hook one of the lips of the cage nut through the square rail perforation.
-
 1
1 -
2
-
3
-
4
-
5
-
6
-
7
-
8
-
9
-
10
-
11
-
12
-
13
-
14
-
15
-
16
-
17
-
18
-
19
-
20
-
21
-
22
-
23
-
24
-
25
-
26
-
27
-
28
-
29
-
30
-
31
-
32
-
33
-
34
-
35
-
36
-
37
-
38
-
39
-
40
-
41
-
42
-
43
-
44
-
45
-
46
-
47
-
48
-
49
-
50
-
51
-
52
-
53
-
54
-
55
-
56
-
57
-
58
-
59
-
60
-
61
-
62
-
63
-
64
-
65
-
66
-
67
-
68
-
69
-
 70
70 -
 71
71 -
 72
72 -
 73
73 -
 74
74 -
 75
75 -
 76
76 -
 77
77 -
 78
78 -
 79
79 -
 80
80 -
81
-
82
-
83
-
84
-
85
-
86
-
87
-
88
-
89
-
90
-
91
-
92
-
93
-
94
-
95
-
96
-
97
-
98
-
99
-
100
-
101
-
102
-
103
-
104
-
105
-
106
-
107
-
108
-
109
-
110
-
111
 |
 |
