HP ProLiant 2500 Compaq ProLiant 2500 Servers Installation Guide - Page 82
Attaching the Cable, Management Arm, WARNING, IMPORTANT
 |
View all HP ProLiant 2500 manuals
Add to My Manuals
Save this manual to your list of manuals |
Page 82 highlights
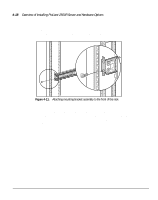
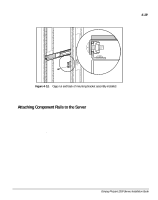
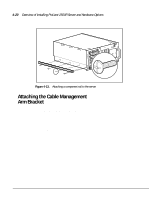
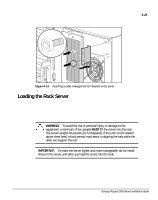
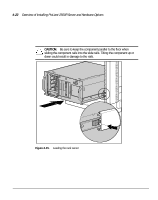
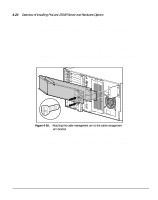
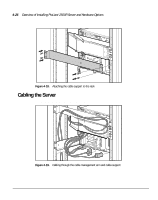
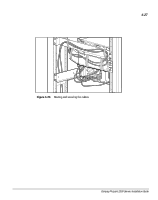
4-23 ! WARNING: To avoid the risk of personal injury, be careful when pressing the component rail release latches and sliding the component into the rack. The slide rails could pinch your fingertips. 3. Depress the component rail release latch on either side of the server and slide the server into the rack. IMPORTANT: The first time you slide the component into the rack, you may have to apply some pressure. After the first time, the ball bearings in the slide will move easily. IMPORTANT: When servicing the server, fully extend the component until the latches lock. To return the server to the rack, depress the latches and slide the server into the rack. 4. Secure the server face plate to the front of the rack by screwing the thumb screws into the cage nuts. 5. Tighten the thumb screws before you close the rack door to prevent the door from hitting protruding thumb screws. Attaching the Cable Management Arm A double-hinged cable management arm and fasteners ship with each server. The cable management arm attaches to the server's cable management arm bracket and to the rear frame of the rack. All cables to and from the server are tied to this arm. The two hinges allow the cable management arm with attached cables to swing out of the way when you need to access the server pull-out trays. Compaq ProLiant 2500 Servers Installation Guide
-
 1
1 -
2
-
3
-
4
-
5
-
6
-
7
-
8
-
9
-
10
-
11
-
12
-
13
-
14
-
15
-
16
-
17
-
18
-
19
-
20
-
21
-
22
-
23
-
24
-
25
-
26
-
27
-
28
-
29
-
30
-
31
-
32
-
33
-
34
-
35
-
36
-
37
-
38
-
39
-
40
-
41
-
42
-
43
-
44
-
45
-
46
-
47
-
48
-
49
-
50
-
51
-
52
-
53
-
54
-
55
-
56
-
57
-
58
-
59
-
60
-
61
-
62
-
63
-
64
-
65
-
66
-
67
-
68
-
69
-
70
-
71
-
72
-
73
-
74
-
75
-
76
-
 77
77 -
 78
78 -
 79
79 -
 80
80 -
 81
81 -
 82
82 -
 83
83 -
 84
84 -
 85
85 -
 86
86 -
 87
87 -
88
-
89
-
90
-
91
-
92
-
93
-
94
-
95
-
96
-
97
-
98
-
99
-
100
-
101
-
102
-
103
-
104
-
105
-
106
-
107
-
108
-
109
-
110
-
111
 |
 |
