HP ProLiant 2500 Compaq ProLiant 2500 Servers Installation Guide - Page 77
brace of the rack with one M6 x 1.0-12L Phillips screw through
 |
View all HP ProLiant 2500 manuals
Add to My Manuals
Save this manual to your list of manuals |
Page 77 highlights
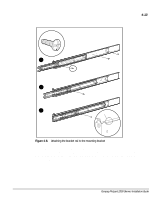
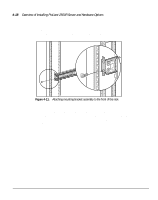
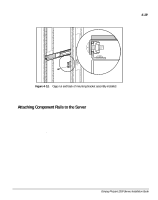
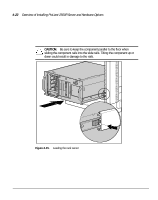
4-18 Overview of Installing ProLiant 2500R Server and Hardware Options 1. Attach a mounting bracket assembly to the front of the rack first, using one M6 x 1.0-12L Phillips screw in the bottom hole of the bracket. Do not use washers. CZR4-011.eps Figure 4-11. Attaching mounting bracket assembly to the front of the rack 2. Carefully align the mounting bracket assembly with the rear rack frame. 3. Secure the back end of the mounting bracket assembly to the back corner brace of the rack with one M6 x 1.0-12L Phillips screw through the bottom hole of the bracket and the cage nut, as shown in the following figure.
-
 1
1 -
2
-
3
-
4
-
5
-
6
-
7
-
8
-
9
-
10
-
11
-
12
-
13
-
14
-
15
-
16
-
17
-
18
-
19
-
20
-
21
-
22
-
23
-
24
-
25
-
26
-
27
-
28
-
29
-
30
-
31
-
32
-
33
-
34
-
35
-
36
-
37
-
38
-
39
-
40
-
41
-
42
-
43
-
44
-
45
-
46
-
47
-
48
-
49
-
50
-
51
-
52
-
53
-
54
-
55
-
56
-
57
-
58
-
59
-
60
-
61
-
62
-
63
-
64
-
65
-
66
-
67
-
68
-
69
-
70
-
71
-
 72
72 -
 73
73 -
 74
74 -
 75
75 -
 76
76 -
 77
77 -
 78
78 -
 79
79 -
 80
80 -
 81
81 -
 82
82 -
83
-
84
-
85
-
86
-
87
-
88
-
89
-
90
-
91
-
92
-
93
-
94
-
95
-
96
-
97
-
98
-
99
-
100
-
101
-
102
-
103
-
104
-
105
-
106
-
107
-
108
-
109
-
110
-
111
 |
 |

.
.
.
.
.
.
.
.
.
.
.
.
.
.
.
.
.
.
.
.
.
.
.
.
.
.
.
.
.
.
4-18
Overview of Installing ProLiant 2500R Server and Hardware Options
1.
Attach a mounting bracket assembly to the front of the rack first, using
one M6 x 1.0-12L Phillips screw in the bottom hole of the bracket. Do
not use washers.
CZR4-011.eps
Figure 4-11.
Attaching mounting bracket assembly to the front of the rack
2.
Carefully align the mounting bracket assembly with the rear rack frame.
3.
Secure the back end of the mounting bracket assembly to the back corner
brace of the rack with one M6 x 1.0-12L Phillips screw through the
bottom hole of the bracket and the cage nut, as shown in the following
figure.