HP ProLiant DL360e HP Intelligent Provisioning User Guide - Page 15
Step 4: Review, Ready to install, Performing maintenance tasks, Active Health System download
 |
View all HP ProLiant DL360e manuals
Add to My Manuals
Save this manual to your list of manuals |
Page 15 highlights
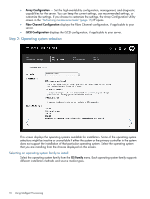
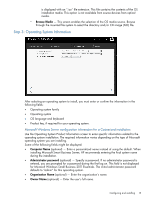
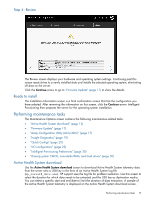
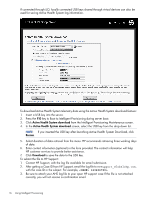
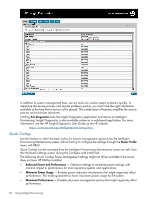
Step 4: Review The Review screen displays your hardware and operating system settings. Continuing past this screen resets drives to a newly installed state and installs the selected operating system, eliminating all data on the server. Click the Continue arrow to go to "Firmware Update" (page 17) to show the details. Ready to install The Installation Information screen is a final confirmation screen that lists the configuration you have selected. After reviewing the information on this screen, click the Continue arrow. Intelligent Provisioning then prepares the server for the operating system installation. Performing maintenance tasks The Maintenance Options screen contains the following maintenance-related tasks: • "Active Health System download" (page 15) • "Firmware Update" (page 17) • "Array Configuration Utility (ACU/ADU)" (page 17) • "Insight Diagnostics" (page 19) • "Quick Configs" (page 20) • "iLO configuration" (page 22) • "Intelligent Provisioning Preferences" (page 30) • "Erasing system CMOS, nonvolatile RAM, and hard drives" (page 30) Active Health System download Use the Active Health System download screen to download Active Health System telemetry data from the server onto a USB key in the form of an Active Health System log file (hp_serial#_date.ahs). HP support uses the log file for problem resolution. Use this screen to select the duration for which data needs to be extracted and the USB key as destination media. You can select a specific start and end date to limit the duration of data extraction. A sample of the Active Health System telemetry is displayed on the Active Health System download screen. Performing maintenance tasks 15
-
 1
1 -
2
-
3
-
4
-
5
-
6
-
7
-
8
-
9
-
 10
10 -
 11
11 -
 12
12 -
 13
13 -
 14
14 -
 15
15 -
 16
16 -
 17
17 -
 18
18 -
 19
19 -
 20
20 -
21
-
22
-
23
-
24
-
25
-
26
-
27
-
28
-
29
-
30
-
31
-
32
-
33
-
34
-
35
-
36
-
37
-
38
-
39
-
40
-
41
-
42
 |
 |
