HP ProLiant DL360e HP Intelligent Provisioning User Guide - Page 6
Using Intelligent Provisioning, Setting Intelligent Provisioning preferences
 |
View all HP ProLiant DL360e manuals
Add to My Manuals
Save this manual to your list of manuals |
Page 6 highlights
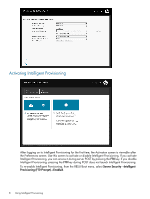
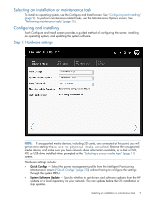
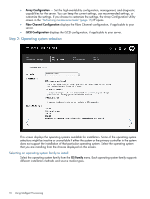
2 Using Intelligent Provisioning Press the F10 key during POST to launch Intelligent Provisioning. The next screen verifies that Intelligent Provisioning is booting. Navigating Intelligent Provisioning Use the navigation icons at the top right-hand corner of the Intelligent Provisioning window to return to the home screen, view the help file, view system information, or power down the server. • Home (home icon) returns you to the Intelligent Provisioning start. • Help (?) provides more information about the screen being viewed. • System Information (CPU icon) displays your system information. • Power (power icon) powers down or reboots the server. • Previous (back arrow) returns you to the previous screen. This selection validates and saves your choices. • Continue (forward arrow) continues you forward to the next screen. This selection validates and saves your choices. Setting Intelligent Provisioning preferences The first time you log into Intelligent Provisioning, you are prompted to set preferences. Use the Intelligent Provisioning preferences to customize settings, which are saved for future use. After the first log in, you can change settings at any time by choosing the "Intelligent Provisioning Preferences" (page 30) option under "Performing maintenance tasks" (page 15). Each menu varies, depending on the network settings chosen. Interface Language Selecting a language from the list the first time you navigate to this screen saves the language, eliminating the need for this step again. Keyboard Language Select the language for the keyboard. EULA Acceptance The first time you navigate to the Preferences screen, read the EULA, and if you agree, then click Accept End User License Agreement (EULA). After you select the check box, the EULA Acceptance item does not appear when you return to the Preferences screen, but the EULA is available to read on the Preferences screen. Initial Network Settings Use this screen to configure the network and share settings. Intelligent Provisioning uses this configuration to establish a network connection to a data share with the operating system contents, and to access the Internet to download the latest system software updates directly from HP. This connection is used only to prepare the server for installation; it does not establish a connection after the server is running. You may choose to use a proxy. For more information, contact your Network Administrator. Depending on whether you choose DHCP Auto-Configuration, IPv4 Static, or IPv6 Static, menu choices could also include the following: • Static IP Address (IPv6 Static must be 64-bit only) - IPv4 address notated by using four decimal numbers from 0 through 255, separated by periods. • Network Mask - IPv4 mask notated by using four numbers from 0 through 255, separated by periods. Typically for IPv4 networks, default subnet mask numbers use either 0 or 255 as values, such as 255.255.255.0, but other number values can appear. 6 Using Intelligent Provisioning
-
 1
1 -
 2
2 -
 3
3 -
 4
4 -
 5
5 -
 6
6 -
 7
7 -
 8
8 -
 9
9 -
 10
10 -
 11
11 -
 12
12 -
13
-
14
-
15
-
16
-
17
-
18
-
19
-
20
-
21
-
22
-
23
-
24
-
25
-
26
-
27
-
28
-
29
-
30
-
31
-
32
-
33
-
34
-
35
-
36
-
37
-
38
-
39
-
40
-
41
-
42
 |
 |