HP ProLiant xw2x220c Remote Graphics Software 5.3.0 User Guide - Page 103
Disabling audio on the Sender, Sound and Audio Devices Properties window
 |
View all HP ProLiant xw2x220c manuals
Add to My Manuals
Save this manual to your list of manuals |
Page 103 highlights
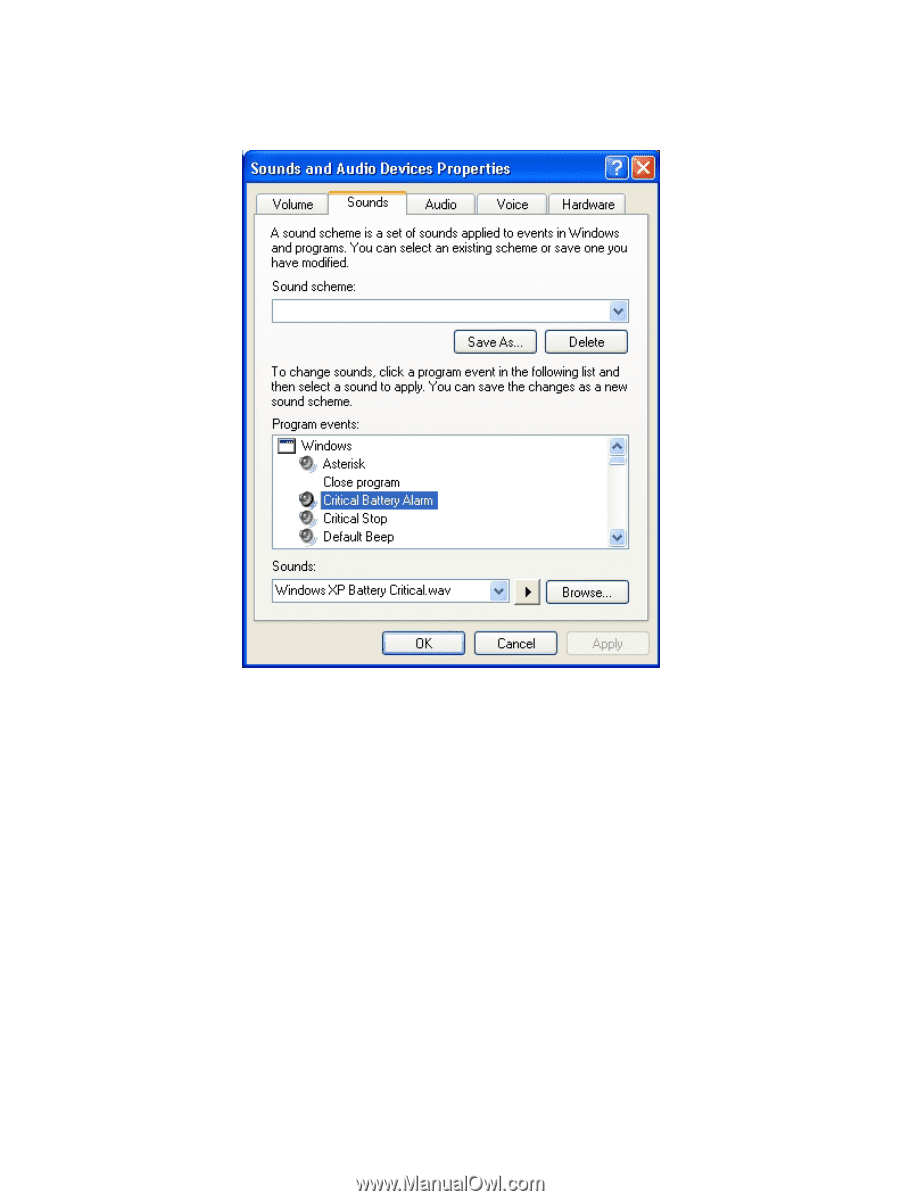
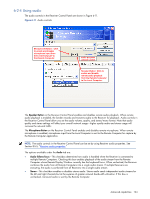
The best sound to play to calibrate your audio device is a low frequency sound with high amplitude. By default, Windows has a program event that meets these requirements. To play this sound, open up the Sound and Audio Devices Properties window, and click on the Sounds tab as shown in Figure 6-10. Figure 6-10 Sound and Audio Devices Properties window Select the Critical Battery Alarm program event, and press the play button (the triangle located next to the Browse button). The wav file associated with this event is recorded near maximum intensity. If you can play this sound without distortion, most sounds should play without distortion. Some media applications modify their audio signal prior to sending it to the audio device. The Windows Media Player may appear to distort some audio files. This is due to signal modification by some type of enhancement, such as an equalizer. 6-2-3 Disabling audio on the Sender Most audio devices will allow the Sender speakers (if present) to be disabled while still allowing audio to be sent to the Receiver. This is done by enabling the mute for the master volume control through the Sounds and Audio Devices control panel or through the Volume icon in the taskbar. The Volume icon in the taskbar will change when mute is enabled. Enabling mute on some devices will prevent audio from arriving at the Receiver. The Realtek audio device used in the HP xw4300 has this issue. One possible solution when running the 32 bit version of Windows is to disable the audio device prior to installing the Sender. This will cause the HP Remote Audio device driver to be installed. The real audio device and the HP Remote Audio device should not be enabled at the same time. The Sender will connect to the first audio device it detects, which may not be the device that is selected by the user. Advanced capabilities 103
-
 1
1 -
2
-
3
-
4
-
5
-
6
-
7
-
8
-
9
-
10
-
11
-
12
-
13
-
14
-
15
-
16
-
17
-
18
-
19
-
20
-
21
-
22
-
23
-
24
-
25
-
26
-
27
-
28
-
29
-
30
-
31
-
32
-
33
-
34
-
35
-
36
-
37
-
38
-
39
-
40
-
41
-
42
-
43
-
44
-
45
-
46
-
47
-
48
-
49
-
50
-
51
-
52
-
53
-
54
-
55
-
56
-
57
-
58
-
59
-
60
-
61
-
62
-
63
-
64
-
65
-
66
-
67
-
68
-
69
-
70
-
71
-
72
-
73
-
74
-
75
-
76
-
77
-
78
-
79
-
80
-
81
-
82
-
83
-
84
-
85
-
86
-
87
-
88
-
89
-
90
-
91
-
92
-
93
-
94
-
95
-
96
-
97
-
 98
98 -
 99
99 -
 100
100 -
 101
101 -
 102
102 -
 103
103 -
 104
104 -
 105
105 -
 106
106 -
 107
107 -
 108
108 -
109
-
110
-
111
-
112
-
113
-
114
-
115
-
116
-
117
-
118
-
119
-
120
-
121
-
122
-
123
-
124
-
125
-
126
-
127
-
128
-
129
-
130
-
131
-
132
-
133
-
134
-
135
-
136
-
137
-
138
-
139
-
140
-
141
-
142
-
143
-
144
-
145
-
146
-
147
-
148
-
149
-
150
-
151
-
152
-
153
-
154
-
155
-
156
-
157
-
158
-
159
-
160
-
161
-
162
-
163
-
164
-
165
-
166
-
167
-
168
-
169
-
170
-
171
-
172
-
173
-
174
-
175
-
176
-
177
-
178
-
179
-
180
-
181
-
182
-
183
-
184
-
185
-
186
-
187
-
188
-
189
-
190
-
191
-
192
-
193
-
194
-
195
-
196
 |
 |