HP Xw4300 HP xw Workstation series Setup and Troubleshooting Guide - Page 14
Ventilation, COA label, and serial number label information, primary display port - bios
 |
UPC - 882780170056
View all HP Xw4300 manuals
Add to My Manuals
Save this manual to your list of manuals |
Page 14 highlights
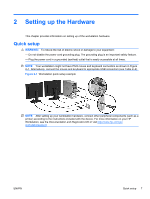
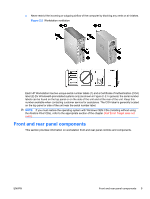
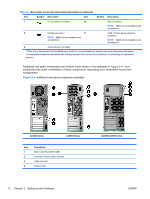
To rapidly set up your workstation hardware, complete the following steps: 1. After unpacking your HP Workstation, locate an accessible workspace to set up the system and connect the mouse, keyboard, and power cables to your workstation. Connect the power cable from the workstation to a power outlet. 2. Connect the workstation monitors, as appropriate for your system configuration, as follows: ● If your workstation has a PCI-Express graphics card with a DMS-59 output receptacle (see Table 2-2), use an appropriate adapter to connect your monitors. Adapters are available to connect the DMS-59 output to two DVI or two VGA monitors. Figure 2-1 (lower inset) illustrates using an adapter to connect dual DVI or VGA monitors to the workstation DMS-59 output. ● If your workstation has a PCI-Express graphics card with two DVI output receptacles (see Table 2-2), you can connect a monitor to each DVI receptacle (using appropriate adapters, if required). NOTE: On a system with two DVI connections, the primary display port (used to display BIOS and other important information) will be port #1; defined as the port physically closest to the system board, and located on the PCI-Express card bulkhead installed closest to the workstation chassis rear panel. ● If your workstation does not have a PCI-Express graphics card, but, alternatively, has an SVGA (see Table 2-2) and a DVI-D output receptacle located on the workstation chassis rear panel, you can connect a monitor to each output. 3. Connect a power cable from each monitor to a power outlet, as shown in Figure 2-1. Ventilation, COA label, and serial number label information Proper ventilation for your system is very important. See Figure 2-2 and the following notes to properly position your system for maximum airflow. ● Operate the computer on a sturdy, level surface. ● Place the computer in an area that is relatively cool with adequate ventilation. Provide at least 6 inches of clearance at the front and back of the workstation. For cabinet installation, ensure adequate cabinet ventilation and ensure that the ambient temperature within the cabinet does not exceed 35o C (95o F). 8 Chapter 2 Setting up the Hardware ENWW
-
 1
1 -
2
-
3
-
4
-
5
-
6
-
7
-
8
-
 9
9 -
 10
10 -
 11
11 -
 12
12 -
 13
13 -
 14
14 -
 15
15 -
 16
16 -
 17
17 -
 18
18 -
 19
19 -
20
-
21
-
22
-
23
-
24
-
25
-
26
-
27
-
28
-
29
-
30
-
31
-
32
-
33
-
34
-
35
-
36
-
37
-
38
-
39
-
40
-
41
-
42
-
43
-
44
-
45
-
46
-
47
-
48
-
49
-
50
-
51
-
52
 |
 |