HP iPAQ h4100 hp iPAQ Pocket PC h4000 Series - User's Guide (343434-001) - Page 110
Manually Entering New Network Settings, Authentication Shared mode
 |
View all HP iPAQ h4100 manuals
Add to My Manuals
Save this manual to your list of manuals |
Page 110 highlights
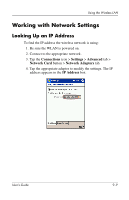
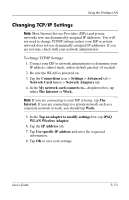
Using the Wireless LAN Manually Entering New Network Settings A wireless network can be added either when the network is detected (the Network Indicator icon is showing in the Navigation bar) or manually by entering setting information. To manually add a wireless network: 1. Be sure the WLAN is powered on. 2. Tap the Connections icon ( or ) > Settings > Advanced tab > Network Card button > Wireless tab > Add New Settings. 3. Tap the General tab and enter a network name (SSID). Note: If a network was detected in step 2, the SSID is automatically entered and cannot be changed. 4. In the Connects to: box, select where your network connects to (The Internet or Work). 5. If you want to connect to an ad-hoc connection, tap the This is a device-to-computer (ad-hoc) connection checkbox. 6. If authentication information is needed, from the Configure Wireless Network screen, tap the Authentication tab. Note: To determine whether authentication information is needed, see your network administrator. 7. Select the type of network authentication to use: a. To use data encryption, tap the Data encryption (WEP enabled) checkbox. b. To use Shared Key authentication, tap the Network Authentication (Shared mode) checkbox. Type the network key in the Network Key: box. User's Guide 9-5
-
 1
1 -
2
-
3
-
4
-
5
-
6
-
7
-
8
-
9
-
10
-
11
-
12
-
13
-
14
-
15
-
16
-
17
-
18
-
19
-
20
-
21
-
22
-
23
-
24
-
25
-
26
-
27
-
28
-
29
-
30
-
31
-
32
-
33
-
34
-
35
-
36
-
37
-
38
-
39
-
40
-
41
-
42
-
43
-
44
-
45
-
46
-
47
-
48
-
49
-
50
-
51
-
52
-
53
-
54
-
55
-
56
-
57
-
58
-
59
-
60
-
61
-
62
-
63
-
64
-
65
-
66
-
67
-
68
-
69
-
70
-
71
-
72
-
73
-
74
-
75
-
76
-
77
-
78
-
79
-
80
-
81
-
82
-
83
-
84
-
85
-
86
-
87
-
88
-
89
-
90
-
91
-
92
-
93
-
94
-
95
-
96
-
97
-
98
-
99
-
100
-
101
-
102
-
103
-
104
-
 105
105 -
 106
106 -
 107
107 -
 108
108 -
 109
109 -
 110
110 -
 111
111 -
 112
112 -
 113
113 -
 114
114 -
 115
115 -
116
-
117
-
118
-
119
-
120
-
121
-
122
-
123
-
124
-
125
-
126
-
127
-
128
-
129
-
130
-
131
-
132
-
133
-
134
-
135
-
136
-
137
-
138
-
139
-
140
-
141
-
142
-
143
 |
 |