Hitachi DZHS500A Owners Guide - Page 152
System Reset
 |
UPC - 050585223943
View all Hitachi DZHS500A manuals
Add to My Manuals
Save this manual to your list of manuals |
Page 152 highlights
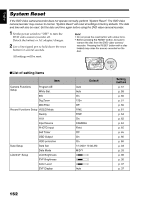
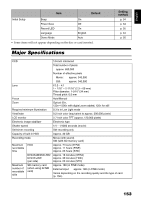
English System Reset If the DVD video camera/recorder does not operate normally, perform "System Reset": The DVD video camera/recorder may recover to normal. "System Reset" will reset all settings to factory defaults. The date and time will also be reset: Set the date and time again before using the DVD video camera/recorder. 1 Set the power switch to "OFF" to turn the DVD video camera/reorder off. Detach the battery or AC adapter/charger. 2 Use a fine tipped pen to hold down the reset button for several seconds. Note: • Do not press the reset button with undue force. • Before pressing the RESET button, be sure to remove the disc from the DVD video camera/ recorder: Pressing the RESET button with a disc loaded may erase the scenes recorded on the disc. All settings will be reset. ●List of setting items Item Camera Functions Setup Program AE White Bal. ElS Dig.Zoom MIC.Filter Record Functions Setup VIDEO Mode Quality 16:9 Input Source PHOTO Input Self Timer OSD Output HDD protection Date Setup Date Set Date Mode LCD/EVF Setup LCD Brightness EVF Brightness Color Level EVF Display Default Auto Auto On 120× Off FINE FINE On CAMERA Field Off On On 1/1/2007 12:00 AM M/D/Y Auto Setting method p. 57 p. 58 p. 60 p. 51 p. 60 p. 61 p. 64 p. 62 p. 64 p. 65 p. 65 p. 66 p. 66 p. 33 p. 33 p. 36 p. 36 p. 37 p. 37 152
-
 1
1 -
2
-
3
-
4
-
5
-
6
-
7
-
8
-
9
-
10
-
11
-
12
-
13
-
14
-
15
-
16
-
17
-
18
-
19
-
20
-
21
-
22
-
23
-
24
-
25
-
26
-
27
-
28
-
29
-
30
-
31
-
32
-
33
-
34
-
35
-
36
-
37
-
38
-
39
-
40
-
41
-
42
-
43
-
44
-
45
-
46
-
47
-
48
-
49
-
50
-
51
-
52
-
53
-
54
-
55
-
56
-
57
-
58
-
59
-
60
-
61
-
62
-
63
-
64
-
65
-
66
-
67
-
68
-
69
-
70
-
71
-
72
-
73
-
74
-
75
-
76
-
77
-
78
-
79
-
80
-
81
-
82
-
83
-
84
-
85
-
86
-
87
-
88
-
89
-
90
-
91
-
92
-
93
-
94
-
95
-
96
-
97
-
98
-
99
-
100
-
101
-
102
-
103
-
104
-
105
-
106
-
107
-
108
-
109
-
110
-
111
-
112
-
113
-
114
-
115
-
116
-
117
-
118
-
119
-
120
-
121
-
122
-
123
-
124
-
125
-
126
-
127
-
128
-
129
-
130
-
131
-
132
-
133
-
134
-
135
-
136
-
137
-
138
-
139
-
140
-
141
-
142
-
143
-
144
-
145
-
146
-
 147
147 -
 148
148 -
 149
149 -
 150
150 -
 151
151 -
 152
152 -
 153
153 -
 154
154 -
 155
155 -
 156
156 -
 157
157 -
158
-
159
-
160
-
161
-
162
-
163
-
164
-
165
-
166
-
167
-
168
-
169
 |
 |
