Hitachi DZHS500A Owners Guide - Page 90
Changing Images For Thumbnails Effect - Thumbnail
 |
UPC - 050585223943
View all Hitachi DZHS500A manuals
Add to My Manuals
Save this manual to your list of manuals |
Page 90 highlights
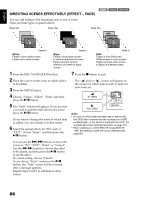
English HDD 1< CHANGING IMAGES FOR THUMBNAILS (EFFECT - THUMBNAIL) Normally, the first image of the recorded scene is displayed as a thumbnail: You can choose another image of the scene for thumbnail. If you set a vivid image to thumbnail, you can know what you recorded from a glance at the Disc Navigation screen. 1 Press the DISC NAVIGATION button. 2 Place the cursor on the scene whose thumbnail you wish to change. 3 Press the MENU button. 4 Choose "Scene", "Effect", "Thumbnail", and then press the A button. 5 The "Change Thumbnail" screen will appear: If you are sure you want to change the thumbnail of the selected scene, press the A button: The selected scene will be played back. Note: • If you press the MENU button before pressing the A button in step 6, the submenu screen will appear (p. 86). • A thumbnail of still cannot be changed. • Since the scene to which skipping is set cannot be played back, you will not be able to change its thumbnail: Release the skip setting of the scene to change the thumbnail. • If a disc on which thumbnail has been set with this DVD video camera/recorder is played on a DVD reorder/player, or the scene is captured into a PC, the set thumbnail will not be reflected (see Note on page 76). • When dubbing on a DVD-RW (VF-mode)/DVD-R/ +RW, the setting on changing thumbnail will not be reflected (see page 80). If you want to change the scene whose thumbnail is to be changed, you can change it on this screen. 6 When the image you want to use as the thumbnail of the scene appears, press the PHOTO/SELECT button. 7 The screen for verifying switching of thumbnail will appear: Choose "YES", and then press the A button. Choose "NO" to cancel switching of thumbnail. After Yes or No setting, the "Change Thumbnail" screen will be restored. Repeat steps 5 - 7 to change the other scenes. 8 Press the C button to quit. 90
-
 1
1 -
2
-
3
-
4
-
5
-
6
-
7
-
8
-
9
-
10
-
11
-
12
-
13
-
14
-
15
-
16
-
17
-
18
-
19
-
20
-
21
-
22
-
23
-
24
-
25
-
26
-
27
-
28
-
29
-
30
-
31
-
32
-
33
-
34
-
35
-
36
-
37
-
38
-
39
-
40
-
41
-
42
-
43
-
44
-
45
-
46
-
47
-
48
-
49
-
50
-
51
-
52
-
53
-
54
-
55
-
56
-
57
-
58
-
59
-
60
-
61
-
62
-
63
-
64
-
65
-
66
-
67
-
68
-
69
-
70
-
71
-
72
-
73
-
74
-
75
-
76
-
77
-
78
-
79
-
80
-
81
-
82
-
83
-
84
-
 85
85 -
 86
86 -
 87
87 -
 88
88 -
 89
89 -
 90
90 -
 91
91 -
 92
92 -
 93
93 -
 94
94 -
 95
95 -
96
-
97
-
98
-
99
-
100
-
101
-
102
-
103
-
104
-
105
-
106
-
107
-
108
-
109
-
110
-
111
-
112
-
113
-
114
-
115
-
116
-
117
-
118
-
119
-
120
-
121
-
122
-
123
-
124
-
125
-
126
-
127
-
128
-
129
-
130
-
131
-
132
-
133
-
134
-
135
-
136
-
137
-
138
-
139
-
140
-
141
-
142
-
143
-
144
-
145
-
146
-
147
-
148
-
149
-
150
-
151
-
152
-
153
-
154
-
155
-
156
-
157
-
158
-
159
-
160
-
161
-
162
-
163
-
164
-
165
-
166
-
167
-
168
-
169
 |
 |
