Hitachi DZHS500A Owners Guide - Page 19
TO/SELECT button - a
 |
UPC - 050585223943
View all Hitachi DZHS500A manuals
Add to My Manuals
Save this manual to your list of manuals |
Page 19 highlights
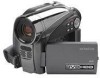
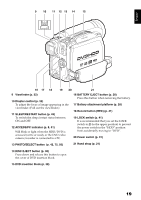
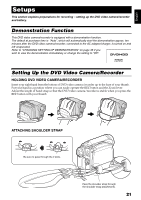
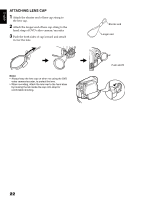
9 10 11 12 13 14 15 English 16 17 18 19 20 21 9 Viewfinder (p. 32) 10 Diopter control (p. 32) To adjust the focus of image appearing in the viewfinder. (Pull out the viewfinder.) 11 SLEEP/RESTART button (p. 43) To switch the sleep/restart status between ON and OFF. 12 ACCESS/PC indicator (p. 8, 41) Will blink or light when the HDD/DVD is accessed (write or read), or the DVD video camera/recorder is connected to a PC. 16 BATTERY EJECT button (p. 28) Press this button when removing the battery. 17 Battery attachment platform (p. 28) 18 Record button (REC) (p. 41) 19 LOCK switch (p. 41) It is recommended that you set the LOCK switch to L (to the upper position) to prevent the power switch in the "HDD" position from accidentally moving to "DVD". 20 Power switch (p. 31) 13 PHOTO/SELECT button (p. 42, 75, 93) 21 Hand strap (p. 21) 14 DISC EJECT button (p. 38) Press down and release this button to open the cover of DVD insertion block. 15 DVD insertion block (p. 38) 19
-
 1
1 -
2
-
3
-
4
-
5
-
6
-
7
-
8
-
9
-
10
-
11
-
12
-
13
-
 14
14 -
 15
15 -
 16
16 -
 17
17 -
 18
18 -
 19
19 -
 20
20 -
 21
21 -
 22
22 -
 23
23 -
 24
24 -
25
-
26
-
27
-
28
-
29
-
30
-
31
-
32
-
33
-
34
-
35
-
36
-
37
-
38
-
39
-
40
-
41
-
42
-
43
-
44
-
45
-
46
-
47
-
48
-
49
-
50
-
51
-
52
-
53
-
54
-
55
-
56
-
57
-
58
-
59
-
60
-
61
-
62
-
63
-
64
-
65
-
66
-
67
-
68
-
69
-
70
-
71
-
72
-
73
-
74
-
75
-
76
-
77
-
78
-
79
-
80
-
81
-
82
-
83
-
84
-
85
-
86
-
87
-
88
-
89
-
90
-
91
-
92
-
93
-
94
-
95
-
96
-
97
-
98
-
99
-
100
-
101
-
102
-
103
-
104
-
105
-
106
-
107
-
108
-
109
-
110
-
111
-
112
-
113
-
114
-
115
-
116
-
117
-
118
-
119
-
120
-
121
-
122
-
123
-
124
-
125
-
126
-
127
-
128
-
129
-
130
-
131
-
132
-
133
-
134
-
135
-
136
-
137
-
138
-
139
-
140
-
141
-
142
-
143
-
144
-
145
-
146
-
147
-
148
-
149
-
150
-
151
-
152
-
153
-
154
-
155
-
156
-
157
-
158
-
159
-
160
-
161
-
162
-
163
-
164
-
165
-
166
-
167
-
168
-
169
 |
 |
