IBM 2498-B40 User Guide - Page 36
Installation instructions, Attaching the front brackets to the switch
 |
View all IBM 2498-B40 manuals
Add to My Manuals
Save this manual to your list of manuals |
Page 36 highlights
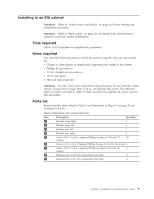
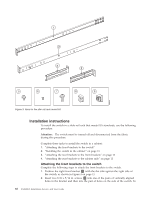
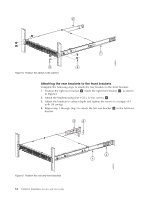
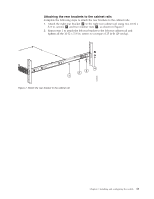
1 2 3 4 5 6 7 8 9 b48f001 Figure 3. Items in the slim rail rack mount kit Installation instructions To install the switch in a slide-rail rack that meets EIA standards, use the following procedure. Attention: The switch must be turned off and disconnected from the fabric during this procedure. Complete these tasks to install the switch in a cabinet: 1. "Attaching the front brackets to the switch" 2. "Installing the switch in the cabinet" on page 11 3. "Attaching the rear brackets to the front brackets" on page 12 4. "Attaching the rear brackets to the cabinet rails" on page 13 Attaching the front brackets to the switch Complete the following steps to attach the front brackets to the switch. 1. Position the right front bracket 1 with the flat side against the right side of the switch, as shown in Figure 4 on page 11. 2. Insert two 8-32 x 5/16 in. screws 3 into one of the pairs of vertically aligned holes in the bracket and then into the pair of holes on the side of the switch. To 10 SAN48B-5 Installation, Service, and User Guide
-
 1
1 -
2
-
3
-
4
-
5
-
6
-
7
-
8
-
9
-
10
-
11
-
12
-
13
-
14
-
15
-
16
-
17
-
18
-
19
-
20
-
21
-
22
-
23
-
24
-
25
-
26
-
27
-
28
-
29
-
30
-
 31
31 -
 32
32 -
 33
33 -
 34
34 -
 35
35 -
 36
36 -
 37
37 -
 38
38 -
 39
39 -
 40
40 -
 41
41 -
42
-
43
-
44
-
45
-
46
-
47
-
48
-
49
-
50
-
51
-
52
-
53
-
54
-
55
-
56
-
57
-
58
-
59
-
60
-
61
-
62
-
63
-
64
-
65
-
66
-
67
-
68
-
69
-
70
-
71
-
72
-
73
-
74
-
75
-
76
-
77
-
78
 |
 |
