IBM 3580-L23 Setup Guide - Page 108
Remove the internal SCSI cable, by pulling it away from the drive.
 |
View all IBM 3580-L23 manuals
Add to My Manuals
Save this manual to your list of manuals |
Page 108 highlights
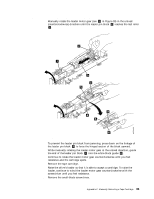
f. Remove the four screws that secure the drive to the chassis (two screws on each side; see 1 in Figure 30). g. Grasp the front of the drive 2 and pull it partially forward. h. (Optional) For better access to the drive's connectors, remove the four screws (two screws on each side; see 3 in Figure 30) that secure the power supply 4 and gently move power supply aside. i. Remove the internal SCSI cable 5 by pulling it away from the drive. j. Remove the internal SCSI address cable 6 by pulling it away from the drive. k. Gently remove the internal RS-422 cable 7 by grasping its wires and pulling straight back toward the rear of the chassis. l. Remove the internal power cable 8 by pulling it away from the drive. m. Grasp the drive and pull it forward again to free it completely from the chassis. Figure 30. Removing the internal drive from the 3580 Ultrium 2 Tape Drive. The figure that is indicated by the arrow depicts the rear of the internal tape drive. 92 IBM 3580 Ultrium Tape Drive Setup and Operator Guide
-
 1
1 -
2
-
3
-
4
-
5
-
6
-
7
-
8
-
9
-
10
-
11
-
12
-
13
-
14
-
15
-
16
-
17
-
18
-
19
-
20
-
21
-
22
-
23
-
24
-
25
-
26
-
27
-
28
-
29
-
30
-
31
-
32
-
33
-
34
-
35
-
36
-
37
-
38
-
39
-
40
-
41
-
42
-
43
-
44
-
45
-
46
-
47
-
48
-
49
-
50
-
51
-
52
-
53
-
54
-
55
-
56
-
57
-
58
-
59
-
60
-
61
-
62
-
63
-
64
-
65
-
66
-
67
-
68
-
69
-
70
-
71
-
72
-
73
-
74
-
75
-
76
-
77
-
78
-
79
-
80
-
81
-
82
-
83
-
84
-
85
-
86
-
87
-
88
-
89
-
90
-
91
-
92
-
93
-
94
-
95
-
96
-
97
-
98
-
99
-
100
-
101
-
102
-
 103
103 -
 104
104 -
 105
105 -
 106
106 -
 107
107 -
 108
108 -
 109
109 -
 110
110 -
 111
111 -
 112
112 -
 113
113 -
114
-
115
-
116
-
117
-
118
-
119
-
120
-
121
-
122
-
123
-
124
-
125
-
126
-
127
-
128
-
129
-
130
-
131
-
132
-
133
-
134
-
135
-
136
-
137
-
138
-
139
-
140
-
141
-
142
-
143
-
144
-
145
-
146
-
147
-
148
-
149
 |
 |
