IBM 3580-L23 Setup Guide - Page 111
Removing the Cartridge from the Drive, resistance and the cartridge ejects.
 |
View all IBM 3580-L23 manuals
Add to My Manuals
Save this manual to your list of manuals |
Page 111 highlights
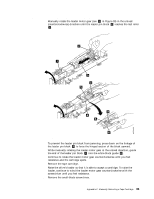
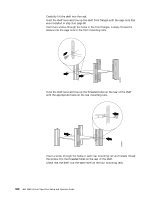
Removing the Cartridge from the Drive 1. Manually rotate the loader motor gear (see 1 in Figure 33) in the unload (counterclockwise) direction until the leader pin block 2 reaches the last roller 3. 2 1 3 4 5 4 6 5 6 Figure 33. Guiding the leader pin into the tape cartridge 2. To prevent the leader pin block from jamming, press down on the linkage of the leader pin block 4 to force the hinged section of the block upward. 3. While manually rotating the loader motor gear in the unload direction, guide the end of the leader pin block 5 into the white block guide 6 . 4. Continue to rotate the loader motor gear counterclockwise until you feel resistance and the cartridge ejects. 5. Remove the tape cartridge. 6. Raise the drive's loader so that it is able to accept a cartridge. To raise the loader, continue to wind the loader motor gear counterclockwise with the screwdriver until you feel resistance. 7. Remove the small-blade screwdriver. Appendix C. Manually Removing a Tape Cartridge 95 a67s0125
-
 1
1 -
2
-
3
-
4
-
5
-
6
-
7
-
8
-
9
-
10
-
11
-
12
-
13
-
14
-
15
-
16
-
17
-
18
-
19
-
20
-
21
-
22
-
23
-
24
-
25
-
26
-
27
-
28
-
29
-
30
-
31
-
32
-
33
-
34
-
35
-
36
-
37
-
38
-
39
-
40
-
41
-
42
-
43
-
44
-
45
-
46
-
47
-
48
-
49
-
50
-
51
-
52
-
53
-
54
-
55
-
56
-
57
-
58
-
59
-
60
-
61
-
62
-
63
-
64
-
65
-
66
-
67
-
68
-
69
-
70
-
71
-
72
-
73
-
74
-
75
-
76
-
77
-
78
-
79
-
80
-
81
-
82
-
83
-
84
-
85
-
86
-
87
-
88
-
89
-
90
-
91
-
92
-
93
-
94
-
95
-
96
-
97
-
98
-
99
-
100
-
101
-
102
-
103
-
104
-
105
-
 106
106 -
 107
107 -
 108
108 -
 109
109 -
 110
110 -
 111
111 -
 112
112 -
 113
113 -
 114
114 -
 115
115 -
 116
116 -
117
-
118
-
119
-
120
-
121
-
122
-
123
-
124
-
125
-
126
-
127
-
128
-
129
-
130
-
131
-
132
-
133
-
134
-
135
-
136
-
137
-
138
-
139
-
140
-
141
-
142
-
143
-
144
-
145
-
146
-
147
-
148
-
149
 |
 |
