IBM 3580-L23 Setup Guide - Page 114
Installation, With the cage nut clip compressed, push the cage nut clip into the square
 |
View all IBM 3580-L23 manuals
Add to My Manuals
Save this manual to your list of manuals |
Page 114 highlights
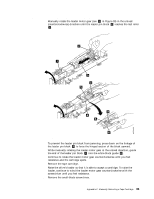
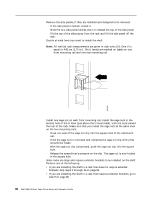
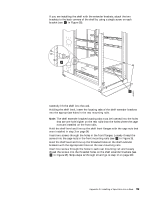
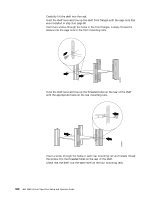
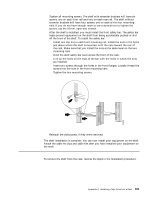
Installation 1. Remove the side panels, if they are installed and designed to be removed. a. If the side panel is locked, unlock it. b. Slide the two side panel latches down to release the top of the side panel. c. Tilt the top of the sides away from the rack and lift the side panel off the rack. 2. Decide at what level you want to install the shelf. Note: All vertical rack measurements are given in rack units (U). One U is equal to 4.45 cm (1.75 in.). The U levels are marked on labels on one front mounting rail and one rear mounting rail. Figure 34. Installing a cage nut in the mounting rail 3. Install one cage nut on each front mounting rail. Install the cage nuts in the bottom hole of the U level (just above the U-level mark), with the nuts toward the rear of the rack. Make sure that you install the cage nuts at the same level on the two mounting rails. a. Hook one side of the cage nut clip into the square hole of the rackmount rail. b. Hold the cage nut in one hand and compress the cage nut clip with a flat screwdriver blade. c. With the cage nut clip compressed, push the cage nut clip into the square hole. d. Release the screwdriver's pressure on the clip. The cage nut is now locked in the square hole. 4. Some racks are large and require extender brackets to be installed on the shelf. Perform one of the following: v If you are installing the shelf in a rack that does not require extender brackets, skip steps 5 through 11 on page 99. v If you are installing the shelf in a rack that requires extender brackets, go to step 5 on page 99. 98 IBM 3580 Ultrium Tape Drive Setup and Operator Guide
-
 1
1 -
2
-
3
-
4
-
5
-
6
-
7
-
8
-
9
-
10
-
11
-
12
-
13
-
14
-
15
-
16
-
17
-
18
-
19
-
20
-
21
-
22
-
23
-
24
-
25
-
26
-
27
-
28
-
29
-
30
-
31
-
32
-
33
-
34
-
35
-
36
-
37
-
38
-
39
-
40
-
41
-
42
-
43
-
44
-
45
-
46
-
47
-
48
-
49
-
50
-
51
-
52
-
53
-
54
-
55
-
56
-
57
-
58
-
59
-
60
-
61
-
62
-
63
-
64
-
65
-
66
-
67
-
68
-
69
-
70
-
71
-
72
-
73
-
74
-
75
-
76
-
77
-
78
-
79
-
80
-
81
-
82
-
83
-
84
-
85
-
86
-
87
-
88
-
89
-
90
-
91
-
92
-
93
-
94
-
95
-
96
-
97
-
98
-
99
-
100
-
101
-
102
-
103
-
104
-
105
-
106
-
107
-
108
-
 109
109 -
 110
110 -
 111
111 -
 112
112 -
 113
113 -
 114
114 -
 115
115 -
 116
116 -
 117
117 -
 118
118 -
 119
119 -
120
-
121
-
122
-
123
-
124
-
125
-
126
-
127
-
128
-
129
-
130
-
131
-
132
-
133
-
134
-
135
-
136
-
137
-
138
-
139
-
140
-
141
-
142
-
143
-
144
-
145
-
146
-
147
-
148
-
149
 |
 |
