IBM 3580-L23 Setup Guide - Page 115
screws into the cage nuts in the front mounting rails see
 |
View all IBM 3580-L23 manuals
Add to My Manuals
Save this manual to your list of manuals |
Page 115 highlights
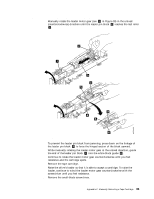
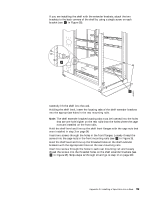
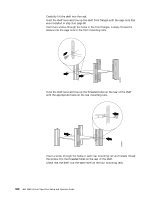
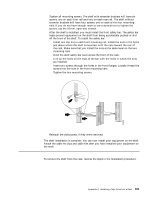
5. If you are installing the shelf with the extender brackets, attach the two brackets to the back corners of the shelf by using a single screw on each bracket (see 1 in Figure 35). Figure 35. Attaching the shelf extender brackets 6. Carefully lift the shelf into the rack. 7. Holding the shelf level, insert the locating tabs of the shelf extender brackets into the appropriate holes in the rear mounting rails. Note: The shelf extender bracket locating tabs must be inserted into the holes that are one hole higher on the rear rails than the holes where the cage nuts are installed on the front rails. 8. Hold the shelf level and line up the shelf front flanges with the cage nuts that were installed in step 3 on page 98. 9. Insert two screws through the holes in the front flanges. Loosely thread the screws into the cage nuts in the front mounting rails (see 2 in Figure 35. 10. Hold the shelf level and line up the threaded holes on the shelf extender brackets with the appropriate holes on the rear mounting rails. 11. Insert two screws through the holes in each rear mounting rail and loosely thread the screws into the threaded holes on the shelf extender brackets (see 1 in Figure 35). Skips steps 12 through 16 and go to step 17 on page 100. Appendix D. Installing a Tape Drive into a Rack 99
-
 1
1 -
2
-
3
-
4
-
5
-
6
-
7
-
8
-
9
-
10
-
11
-
12
-
13
-
14
-
15
-
16
-
17
-
18
-
19
-
20
-
21
-
22
-
23
-
24
-
25
-
26
-
27
-
28
-
29
-
30
-
31
-
32
-
33
-
34
-
35
-
36
-
37
-
38
-
39
-
40
-
41
-
42
-
43
-
44
-
45
-
46
-
47
-
48
-
49
-
50
-
51
-
52
-
53
-
54
-
55
-
56
-
57
-
58
-
59
-
60
-
61
-
62
-
63
-
64
-
65
-
66
-
67
-
68
-
69
-
70
-
71
-
72
-
73
-
74
-
75
-
76
-
77
-
78
-
79
-
80
-
81
-
82
-
83
-
84
-
85
-
86
-
87
-
88
-
89
-
90
-
91
-
92
-
93
-
94
-
95
-
96
-
97
-
98
-
99
-
100
-
101
-
102
-
103
-
104
-
105
-
106
-
107
-
108
-
109
-
 110
110 -
 111
111 -
 112
112 -
 113
113 -
 114
114 -
 115
115 -
 116
116 -
 117
117 -
 118
118 -
 119
119 -
 120
120 -
121
-
122
-
123
-
124
-
125
-
126
-
127
-
128
-
129
-
130
-
131
-
132
-
133
-
134
-
135
-
136
-
137
-
138
-
139
-
140
-
141
-
142
-
143
-
144
-
145
-
146
-
147
-
148
-
149
 |
 |
